Category: Student work

Italy, Spain, Germany or the UK?

I decided to look at how the different countries in Europe responded to Covid-19, did some put their message across clearer? What could be done better? To narrow down the countries I chose Italy which was the epitome of the pandemic for a while as well as Spain which also went into quite a drastic lock down in comparison to the UK. In addition to this I also included Germany in this, as in my mind Germany is a very pragmatic and effective country.

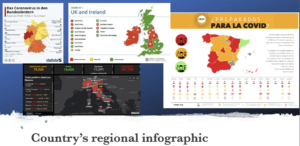
Looking at the different infographics showcasing the pandemic is interesting. Whilst they all broke the country into regional areas (apart from Italy) They all use different colour coding, and yet they all have the same principle – red is the highest danger. In addition to this most countries use the traffic light system to put their message across to the general public very effectively. Spain does take this a step further and show various other categories for each region using pictograms. Italy also does more than Germany and the UK by giving a list of the most impacted areas and showing the survivors as well as deaths and people who tested positive for coronavirus.


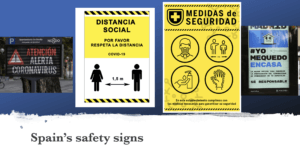
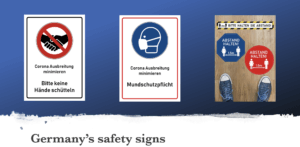
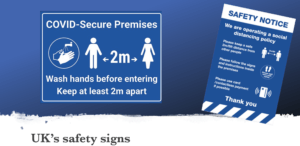
When looking at the general colours used in these official signs in the various countries it’s quickly apparent that the preferred colour for this is blue. Though Spain seems to prefer using yellow, whilst Germany uses both red as well as blue equally. I think this might be due to the road sign rules, where blue means instructions. This makes a question about how effective the Spanish road signs really will be.


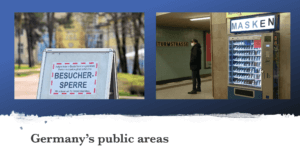
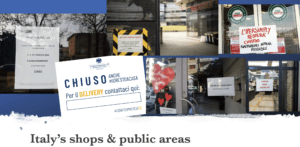
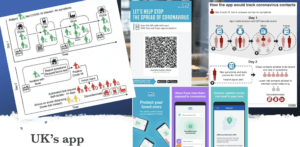
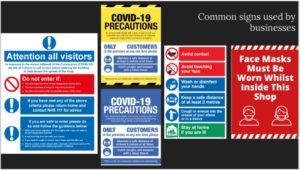
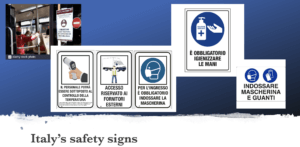
Looking at how countries handled public areas & shops the UK seems to be more effective with it than the rest. This is mainly due to the NHS app, though it does rely on everyone having a mobile phone which can scan QR codes, which isn’t always the case… Nonetheless through the app people are more likely to be notified about potential exposure to Covid-10 than in the other countries like Germany, where they have forbidden visitors from entering a public area (shown above) as a precaution. Having said this Germany does have mask dispensers in public areas so no one will have an excuse for not wearing a mask on public transport, shops, schools, etc. Moreover, Italy has got an official government issued template for restaurants. Very interestingly the only word in yellow (the rest is blue) is “DELIVERY” which, as we know, is an english word. This could mean the locals and tourists all understand that they have to call the number listed bellow (once filled in) to order, as they are only available for deliveries. No other government has issued templates as such for shops and restaurants so this might be something worth looking at to implement as well as the mask dispensers.


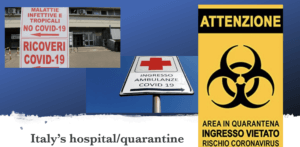
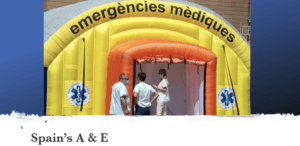
Another thing I noticed with foreign countries is the hospital and quarantine signs. Whilst I didn’t find english coronavirus quarantine signs the remaining 3 countries are worth looking at. What these signs indicate is that the Covid-19 is in the same area as a hospitals A&E generally, which I think is the worst place. The most vulnerable people in critical conditions closest to the virus? Spain resolved this problem by putting up a temporary A&E tent though this is obviously not ideal, until a better solution is found this is acceptable. Moreover, looking at the quarantine signs Germany opted for stop and no entry signs which very clearly portrays their intent. Italy on the other hand took it a step further. Instead of the everyday stop signs they modified the universal toxic sign into a quarantine sign for Coronavirus, making it highly effective as people will definitely take notice of a sign usually portrays mortal danger. We will make time to read what the pseudo toxic sign says, even if we cannot speak the language the “coronavirus” at the bottom makes its meaning clear to everyone.

Staircase

                                                                                       Staircase illustration


On Monday, we have been assigned to create a book cover that will narrate the story of the book. I have chosen the “Staircase” as my theme for the book cover.It was a story about a man who was barely sick and placed at the 7th floor, however as the time passes by he is moved to the ground level. Even though he wasn’t very ill, he ends up being on the ground floor and therefore, in the grave.

As, the story began at the top floor of the  hospital, and I drew a staircase that started from the title of the book (upper floor) and ended with a photo of a man hugging Death (last floor-grave).The idea behind the picture is , man led himself into the death. I drew a black mantle and a scythe over the   woman to represent her as a death. I  used a black marker to make an illustration of  the staircase and Death, as it looked more dramatic.

Creation of the Penguin Cover

Original Cover


On  Tuesday, we have been given a task of creating a penguin cover. It was a first time  I was using and an InDesign program. I found it very confusing at first, but we had been given a recorded video which helped a lot. The most confusing part was the creating of Penguin Books logos, as we had select, crop, reflect and then shaped the ovals, that were added to one shape. I have spent a lot of time on completing the task, but it was worth it! 😀


Cover created by me


The cover of my book was inspired by a Netflix television series, which was “Emily in Paris”. I have chosen “red” as a main color, because it  represents “Love” for me and “Emily in Paris” is all about romance. I have decided to place the penguin at Trocadero, as it would reflect the theme of the book more. The title of the book is also in red color, as it creates a connection between the upper and the lower part of the book. Initially, the file was in PDF format, but as i converted it in JPG, it lost its quality. Overall, I have enjoyed the freedom of designing the cover, as it let my put all thoughts and creativity in it.

Exploring Typographic Hierarchy

For this project, we had to use Adobe Indesign to create a cinema brochure for the Reading Film Theatre. I wanted my design to be clean and contemporary, using red as the accent colour, to put emphasis on certain elements of text. To continue with this simplistic look, I only used one typeface, but used intrinsic valuables, such as size and weight of the text. This will hopefully allow the viewer to see a distinction between the different elements of the brochure. For example, I put the contact information for the theatre in italic and made it smaller than the main body of text.

Here you can see my initial design sketch:


Here is my first brochure design:

After a blackboard feedback session, it was highlighted that the lack of colour variation removes the importance of the highlights of red. It was suggested to use the tint tool on Indesign and create varying shades of red to allow the largest emphasis to be on the titles of the movies. I also used this tool to add some grey tones into my design to add further contrast. Continuing with this idea, I also incorporated more variation within the main body of text, allowing a clearer hierarchy of information. Finally the alignment of the title in my first design was pointed out as being a little confusing. As a result, I took some steps to try and make this more logical and more visually appealing.  Finally, we had a peer review session in class where we were able to give feedback on each other’s brochures. Taking this advice on board as well, I refined my design.

My final outcome can be seen below.

I really enjoyed this project as it allowed me to explore Indesign and put my new knowledge about typography into practice. I also found the feedback sessions extremely useful and I am very grateful for all the advice I was given from both other students and tutors.

command, return

Last week in TY1INT we were given a mini week project to design a cinema leaflet of film listings. The project prompted us to think about the reader and how we could make the experience of reading a cinema leaflet easiest for a range of different users.

By the time I began the project I had already forgotten the shortcut for applying a paragraph style to text in InDesign. And now I’ve finished, I doubt I’ll ever forget it.

This project really helped me get a feel of using InDesign for my own work, outside of technical sessions where help is always at hand. I find that learning this way helps me remember shortcuts and learn handy things about the toolset provided in Indesign and how to use it to create interesting yet useful things.

I didn’t focus on the aesthetics of the leaflet as I wanted to get to grips with using a hierarchy of text in an applied manner. To start off with I found Reading film theatres logo to give the leaflet more of an identity and give myself a guide as to what colours to use. It was fun to see the variation of style you can achieve with a limited colour guide and using only one (or two) typefaces.

After today’s feedback session, I am aware of some errors made in my design that I will look out for in future work, including correct hyphenation, and being aware of separating info on line breaks.  Overall I am quite happy with my outcome and maybe next time would focus on adding more visual identity to the leaflet.

cinema listing v04


Japan in a Coffee Cup

So for the ideal gifts project i was working with a story about a trip to japan, my partner described Japan as an entirely different world. This got me thinking. How could I actually create another world? The idea i settled on was have a bubble that represented another dimension which contained some symbolic elements of Japan.

I was then given the random word of coffee. I had seen a trend in kawaii Japanese artwork using drinks bottles as containers for their artwork and thought this would be a brilliant way to convey my idea. So here we have Japan as coffee.

My Film Flyer

My cinema brochure. I experiment a bit with different layouts when it came to making my brochure, however will admit to going a bit off the brief as I wanted to explore looking at a design with the days at headings, as I noted that Tuesday, Thursday and Saturday were the days of film showings. I actually was quite happy with the final outcome, using black, red, and white for the whole colour scheme, as we were told we could add in just one more colour. I chose red of course, as it matches with the feel of a cinema and the red carpet. I do wish I’d perhaps used a bit more red, or had the time to create some kind of logo that linked with the key colours to link my brochure together a bit neater, and a logo always helps to look more professional or branded.

I used different fonts to help separate text, and messed around with using bold as well, as way of highlighting which films had subtitles and audio description, I didn’t want to make this detail too over powering, but enough that it clearly stands out for the reader. I used the red to highlight dates and times, including the ‘Autumn Term 2017’ at the top. As in my opinion, making sure the dates and times are clear, is one of the most important aspects, because if the audience can’t even tell when a film is showing, there is no way they’ll bother to book a ticket.

I definitely could have improved on my design in a could ways, such as at second glace I note there is spacing on the top row, and could have been made to be a lot more even. I did actually enjoy this task more than I thought I would, but to improve would next time want to add some small graphics or illustration.

Reading Movie Time

Reading Film Theater final

The project was to design a Reading movie leaflet for an International audience and family.

It was difficult to try and put all the information in (2) two columns at the same time make it legible and readable for the target audience but over some time I was able to overcome this difficulty.

I originally wanted to follow the University of Reading logo colour red as my background colour but was told from the peers feedback that it was not ‘aesthetically pleasing or easy on the eye’ for a movie leaflet so I choose a darker shade (maroon) as my background colour so that is can have a better contract with the white text.

I use a basic layout of the border around the edge with a white box at the bottom with a maroon colour text so the information would not blend in with the movie listing information and give it a bit of a hierarchy. The result made the text easier to read and stands out the most. Overall, it was effective.

When printing this work I found out I made a lot of little mistakes that I could not notice on the screen such as some spacing issues, line lengths and cutting someone’s name in half. I Should try to make sure to keep a consistent layout and make sure to pay close attention to the detail. Overall, I think I did really good work.

Information design is fun

While doing this task I learned that it can be hard to keep track of all the different types of data you might need to handle when doing information design. I thought that my stylings were sufficient but on closer inspection I missed highlighting a lot of information, such as what language the films is and whether the film has subtitles or not. I also now have a greater appreciation for how hard its can be to get all of your information on one page, as it took a lot of adjustments so that the text fit snugly within the margins of one page. Feedback indicated that my decoration clashed with some of the information for the films, so I increased the transparency so that the text contrasts more with the background decoration.

Safety signs

I’ve found that there are different categories that are common withing the signs. Overall, most of the signs were yellow to attract attention and to alert people. On some occasion, the use of a blue and white text was used.  I categorized my work with the message of the sign. There are a lot of signs around shops to make sure that people are following the rules.