During the Autumn term, the Department organised and paid for a trip for the Part 3s to go to London and visit the MagCulture. Not only were we immersed in inspiration for our own magazine designs and concepts, but we also enjoyed a talk from Jeremy Leslie about the current state of the independent magazine scene. After the talk and trip were done, the year went out together as a Department social in London. With train tickets provided by the department through the Typography Student Fund we were able to get out of the building and experience magazine world in its fullest form.
During Jeremy’s talk, he showed us a range of current trends and creative ideas… to to the extremes of a single plank of wood being sold as a magazine! He opened up his shop to us, which covered every genre in the magazine world, where we were allowed to browse, take pictures and experience the materiality of these objects firsthand. Take a look at their instagram for inspiration: https://www.instagram.com/magculture/
From all of us in Part 3, I would like to thank Sara and Rob for organising this trip. We’d also like to thank all the clients from Real Jobs who have donated to the Typography Student Fund, making an educational event fun.
The idea behind design 1 as a final design is that it shows one of the new skills I learnt for this task. This was my first attempt at working with layer masks and I can now say that I have a better understanding of them after carrying out this design. I feel that this design shows that I understand how to use layer masks to design a creative photo.
Final Design 2
Changing the image in the background
I have chosen design 2 as a final design as it shows another one of my new skills I have learnt from a tutorial. Whilst also pushing my experiments with layer mask; by using layer masks in a different way to the previous design. I am happy with how this design turned out, and feel that I am getting the hang of layer masks and will start to use them more in the future. As they are a really useful tool. I also feel I now know how to better manipulate images by merging two together. As previously when I have tried to get an outcome similar to this it has looked messy, But then again I did not use layer masks before.
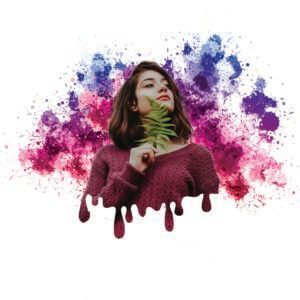
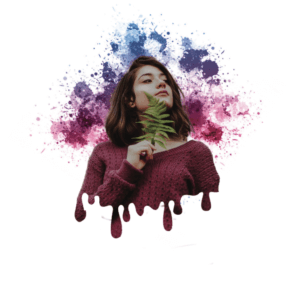
Final Design 3
Dripping & Splatter effect
For my last design I wanted to experiment with layer masks to create a dripping / splatter effect. I found this hard to do with one of my own photographs as I have never done this before and I struggled to find a simple picture that was right for this. So I decided to download the file provided for one of the tutorials. I chose this design as one of my final designs as I feel that I am starting to master layer masks and because of this, I was able to create an image with dripping and splatter effects. Also this designs shows a different experiment to my previous ones.
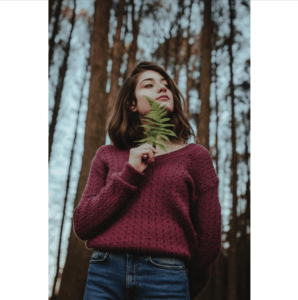
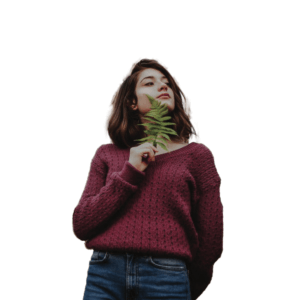
original photo
For my final design I was set to try and experiment with dripping and splatter effect created through layer masks. I watched a couple tutorials on this but I felt I hadn’t quite found the right one to follow yet. I used my last tutorial and downloaded their files to follow their tutorial. I was going to use my own images to follow the them but I found this very hard to do, as I wasn’t sure on how to do it still. So I decided to use their images they provided.
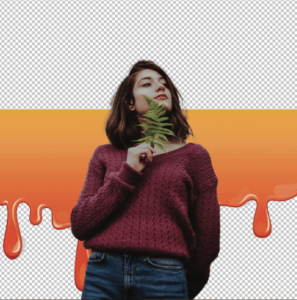
Quick selection tool
I started off by using the quick selection tool to select the girl in the photo, I then added a layer mask to get rid of the background in the image. I duplicated this layer but made one invisibly.
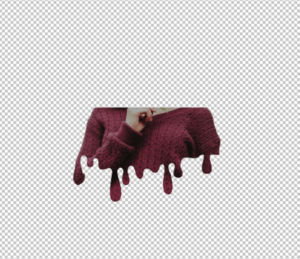
Dripping layer
My next step was adding the dripping image provided onto my art board. I used the magic eraser tool to get rid of all the unwanted white on this layer. (I never knew the magic eraser tool existed so this was a new tool for me to learn).
Mask layer
I then placed the dripping image behind the layer of the girl and resized it to where I would want the dripping on the girl. Whilst being on the dripping layer, I selected the mask of the girl and pressed add mask.
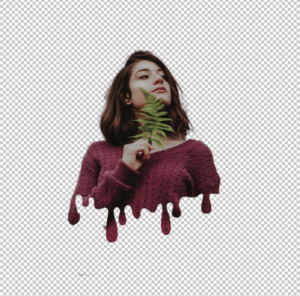
dripping effect
I then made the original layer visible and erased the bottom half of the girl, creating the dripping effect seen as the image above.
Development of splatter
After knowing how to do this, it is quite easy to create the dripping effect using layer masks. Although it is still a long processes. Instead of leaving my design here, I stretched it further by adding splatters into the final design.
Software tutorials
I used a wide range if tutorials for this task; some more useful then others. In this blog I will discuss the more useful of the tutorials I was, focusing on the ones that helped me with my designs.
Combine black and white with colour Is the tutorial I found most helpful with when creating my Design 1. I never knew how to properly do this before as I always found a long winded way round this before, so it was useful watching this and learning about an easy way to achieve this. I wanted to try this for one of my designs and follow it step by step to make sure I understand and knew how to achieve this.
Changing the image in the background I used this tutorial for my Design 2. Whenever I have tried this before it has always come out looking messy or unprofessional. So it was useful watching this tutorial and learning how to do it properly and creating a good outcome without getting frustrated along the way as it isn’t working or coming out how I want. So this was a good tutorial to watch as I learnt how to properly do it. Which will enable me in the future to create work that I have wanted to create before but didn’t know how.
For design 3, I watched many tutorials to try and understand how to create this effect. I found that each tutorial taught it in a different way. The tutorial I followed for this design was Dripping paint splatter. I found it the most easy to follow and one which had all the images available to download to follow each step. What I worked out following these tutorials is that you need images to full-fill the dripping and splatter effect, or your other option is to draw it. There is not one tool (that I know of) out there to create this effect.
I would like to further my skills by putting this into practice and creating more complex designs. I would also practice the dripping and splatter effects different ways on my own photos, as this will enable me to perfect my skills. I plan to do this by watching and following more tutorials.
Resources for research and inspiration
I mainly used tutorials as my resources for research and inspiration. As for this task, it wasn’t just about the outcome, rather it was about learning how to use layer masks to the fullest so in the future I can create unique designs. Therefore, I didn’t spend time looking at outcomes that I could create, rather how I could create these outcomes.
Design 3 was the design that used the most research before creating. I always saw design pieces like this and wondered how to actually get this outcome. Was there a tool? Was it a filter? I still feel there is more to this then what I learnt for this task. Therefore this is something that I want to explore further in the future. But what I can tell you, is what I know now and what I learnt.
Have a go at the ‘Dripping and splatter effect’ that I linked previously, as I believe this tutorial is a good starting point and the most easy to follow and understand. Along with the way they did it using layer masks just is easy to understand compared to some of the other tutorials that I found.
If you want to experiment another way try Dripping effect. I found this tutorial useful and easy to follower, as the designer talked over his steps of what he did and why. I would recommend trying this after the previous tutorial.
Overall, for this task I learnt how to use layer masks and now that I understand them; they are actually a very simple and useful tool to know and use. Not only do I know how to use layer masks one way, I understand how to do multiple different effects using them. This was through the variety of tutorials I watched.
Every time I add my flyer as media it seems to add a link to the PDF version of it. But anyway here is the link below to click on if you want to have a look.
I chose to use only black and white, as I felt it differentiated it as a flyer rather than a poster (whilst keeping it simple). I used lines to separate each film and make it easier to read. I used a grid system within the 2 columns, to make the date, rating and time easier to follow and read rather than just a block of information.
I added in about us at the bottom as I believed that it is important to know who to contact and where to go.
Enjoys listening to music, favourite artists are Krept & Konan, Headie one, AJ Tracey…
Likes to watch TV and films a lot. some examples are Brooklyn 99, Power, Fast and Furious…
Likes technology, using it, watching videos about it…
Below were my initial brain storm of ideas from his facts:
My three random words were:
Software
Game
Bomb
Below, are my concepts shown through the matrix grid. I came up with all these using one of the elements above, and sometimes mixing them.
From there I re-drew my two final ideas for the gift. These were: 1 pair of temple discs and a Smart ring. Can be seen below.
The concept behind the Temple Discs are that when you put them on, they link to your brain. They take you into a different reality, where you can live as a character in you favourite tv show/film. I thought this was a good idea and it is a new experience as instead of just watching you are living it too. I came up with this concept from his love of watching tv and films. But also from the two random words of game and software.
My second final idea is called Smart Ring. It links to your brain again, however this time you control it all. You can speak to it to find out information, can control music, read out a text for you, send texts and make calls for you. Lastly works as a camera by capturing what you see from your own eyes. I got to this idea from the random word of software and my partners love for music and technology.
The noun I was given was social media. I had a few ideas for this word which can be seen below in my brain storm.
I started my taking photos so I would be using primary photos instead of secondary . I then opened my photos in photoshop and developed them within the software. Resulting in these two images.
I went for this concert people as the image is more than less the same with change one element; the control. I found that my other ideas changed more than one element, therefore may not of been best suited for this brief.
I went for the concept of representing social media through someone liking posts on there. (to make it more clear by adding in the logos in the background). To another view that social media is toxic and controlling us. As the hand stretches to like the photo, whilst being with strained by the charging cable connected to the phone.
For this project I split my collection into 5 different categories:
Magazines
Posters
Social distancing
PDF downloads
Covid-19 street art
For magazines I focused on Vogue and Time, as I found that they both covered controversial views on covid-19. I particularly liked these two covers from Times. (I found both images below in the vault for Times, under covers from 2020 https://time.com/vault/year/2020/)
If you are following the news at the moment you will find that America seems to believe that they are immune to covid-19. Or a better way to put it, is that it is a myth (according to their president Mr Trump).
I found the Trump cover ironic as when it was published (14th May 2020) it states “over the past 14 weeks 84,000 Americans died of Covid-19.” Yet America did not seem to be doing much to slow down the death toll. I found this magazine cover portraying the political side of covid-19. Bar the controversial message the image is portraying. I particularly liked the graphics and typography that was being used. It’s a fairly simple image with type and an illustration of Donald Trump with a mask (that is not being used affectively), yet it is clever. I like the message of the mask not cover his mouth, as he believed masks to be stupid; yet we all sat here wearing them everyday.
The second magazine cover, covers a social issue during the pandemic. Of the youths of this time and how this will shape their life forever. I found this one a good one to use, as we right now are in education and we are the youth being affective by this. The photographer Hannah, has been virtually photographing her classmates in quarantine. This imagery was done by a student which is why I think it is a good one to study. The issue Hannah wanted to portray was that she found that she was stuck in limbo due to covid-19. These years are the ones she’s meant to be transitioning into adult hood, yet she’s feels like she’s going backwards being stuck in her childhood bedroom for the past several months. I found this topic interesting as I don’t think its normally portrayed. I found a lot of social distancing and instructions graphics for covid. But this was the only ‘generation pandemic that I found. Which you would think there would be more off with the amount of students and people being effected in education by this.
For both these topics, I believe that the target audience is meant to be different, yet has ended up the same. They are both a cry for help to the general public of this issues following this pandemic; outside of the deaths.
I found this session interesting and it refreshed my knowledge on how to use indesign. The one part I struggled with was the penguin book logo. I found it hard to make the curve of the ovals. Which I have gone over by re watching the video from that day.
For my messed up book I chose blood orange, as it is my most recent read book. I kept the layout the same as the original penguin books and altered the other elements. The changed the font to Chalkduster to create a horror effect. Although I would never use this typeface again as it just wrongs all the Typography rules on so many levels. I used neon pink as my colour as original penguin uses neutral respectable colours, so thought it would create more fun. I lastly changed the colour of the penguin symbol to a space galaxy effect. Just to add to the fun quirkinesses of this new cover.
Labyrinth: a family moves into a house with unexpected spatial characteristics. The rooms keep shifting position every time a door is opened. The family members are trapped inside the house and start a journey to find the front door. While they keep moving from one room to the next, they discover that they are not the only ones lost in the impossibly infinite labyrinth of the house.
I shaped first half of the book in the outline of a house which can be seen to have a door and a variety of stairs to create the labyrinth affect in the background. I felt that my front page in the first page to the story and is a good way of visualising telling the story.
Here the inside of my book can be seen, on the left is this idea of stairs created out of the books pages, all being connected to a single door. Representing the idea of once the door closes another room appears on the other side. In a way the door represents a portal.
on the right hand page Is the outline of a door getting smaller and smaller as you go though the pages, representing the never ending of this house. I burned the stairs on this page to show them disappearing as you go through the each door.