Category: Drawing vector objects

Illustration – Homegoing, Yaa Gyasi

As part of the spring term TY1SK module, I completed a range of design tasks to improve and build my Adobe software skills. Here’s a blog post about my ‘Drawing Vector Objects’ task, where I made an illustration for a social media banner about Yaa Gyasi’s book ‘Homegoing’. Throughout my design process, I took several screenshots to help explain how I ended up with my final design.


Design ideas and design process 

According to my research into this book, the author is a Ghanaian-American. Ideally, I’d like to create something unique to her country. In Ghana, hibiscus (flower) is a very popular flower. To create the background pattern, I’ll use Ghana’s flag colors, but in pastels. 


Figure 1. Inspiration and sketch, color swatches

As the design process went on, my Illustrator skills improved a lot.
My first step was creating a background pattern, but watching tutorials helped me get a better solution in the end.


Figure 2-4. This is a screenshot of the process I used to create a background pattern. I selected all three colors and then chose Object – Pattern – Make from the menu bar. After selecting the proper options to rotate this pattern, I was able to see how it would look later on. The pattern was saved in the Swatches panel, and then a rectangle was drawn using the Rectangle Tool, which was already filled with the pattern. In the last image, we can see the final pattern for the background.


Figure 5. Tracing the initial sketch

The final design was achieved using the Pen Tool, which allowed me to follow my plan and bring it to life this vector-based illustration.

Software tutorials

During my pattern creation process, I encountered a problem, and it took me a while to resolve it. The problem I experienced was that I was unable to obtain a rotated version of my pattern. To achieve the desired result, I set some pattern options (Tile type: Brick by Row, 1/3) and then used the Rotate Tool to achieve the desired result.

   
Figure 6. Setting Pattern Options                         Figure 7. Rotate the pattern using Rotate Tool

There were several software tutorials provided in the brief that showed a partial solution to this problem. However, this was not sufficient, so I searched for further online tutorials that provided me with the necessary information. I found this particular tutorial where I learned about Pattern Options and how to set them correctly.

The following is another very interesting tutorial I found useful:


Design resources and articles

When searching for research sources, I became interested in the book’s story. An African family and their descendants are traced through generations in this novel, beginning with two sisters in 18th century Ghana – one who stayed and one who was shipped to the United States.

To avoid copying and pasting the original cover page, I conducted additional research on Ghana as a country and its characteristics. As a result, I decided to use the colors of the country’s flag (red, green, yellow, black) and the emblematic flower hibiscus, which gave the banner a distinct African feel.

As part of my research, I read a number of reviews from famous newspaper websites in order to gather as much information as possible regarding the book and the author. For example:

https://www.theguardian.com/books/2017/jan/13/homegoing-by-yaa-gyasi-review

https://www.thetimes.co.uk/article/transcendent-kingdom-by-yaa-gyasi-review-lrsq80djp

and many more…


Learning throughout the module

It was a very helpful experience completing this module’s tasks as it allowed me to gain a better understanding of Adobe software. Despite this, I can clearly state that it was somewhat time-consuming to watch a variety of online tutorials until I discovered the right ones for my specific needs. Despite this, I was able to learn a little bit from each of them. The time I took to complete this task was definitely worth it, and I am looking forward to working on more of them in the future.

Taking the last two quizzes, I realized I still need to continue watching instructional tutorials and lessons, which I presumewill give me more confidence in completing and designing my own projects in the future.


Designing a podcast banner for Facebook using Illustrator

Design ideas and design process

The book I was designing the podcast cover for, which the design was also based off of.

After looking at the book cover I was designing the podcast cover for, I already had an idea in mind where I would utilise the diamond shapes of the cover to create an engaging and aesthetic Facebook banner. I’d also decided to use the cover’s same colour palette to create an effective link between the banner and book.

After using the eyedropper tool to get the exact colour swatches from the book, I decided to use the oranges and reds for the background, and the navy blue for the text since the blue would be easiest to read, due to its darker shade, and the oranges and red would allow me to create eye-catching contrasts in colours which would be highlighted through the diamond shapes I’d planned to use.

For the background base colour, I made sure to use the lightest orange to create a stronger contrast with the darker shades of diamonds that would be placed on top of it.

Here I create a white diamond shape for my text using the line tool, before joining then using the join path tool (ctrl+J) and filling it in white.
I copied the initial lines of the white diamond and enlarged it slightly to use as a guide for where the smaller diamonds, created with the same method as the white diamond, would line up, so they would remain even and uniform.
I copied and pasted the completed diamonds section and transformed them (rotated, reflected) to fit the other areas of the banner to maintain uniformity.

With the diamond shapes being the highlight of the banner, I decided to outline them in black to emphasise their shape whilst also making it more eye catching, further highlighting the contrasting colours.

After outlining the diamonds in black.

As seen above, I then added my text and used a font that I thought was most similar to the font used in the book cover: I used Haettenschweiler.

However, I thought the white diamond text box looked too plain, since there was a mass of negative space, and so I decided to resolve this problem by implementing the flowers from the book cover. I altered them slightly, so they were not completely identical so there was some sort of differentiating factor from the podcast and book. I created the flower shape by placing 6 identical circles into a flower shape, before merging them into one using the pathfinder tool.

The finished product

Then, I duplicated the flowers and adjusted their sizes to fit within the white diamond text box, varying sizes to fill up majority of the negative space, whilst not making it look cramped. I also varied the sizes and ensured they were never bigger than the text to not draw attention away from the text, a important focal part of the banner, whilst still allowing the flowers to maintain a presence. I then added strokes using the pen and curvature tool to add movement and link the typography, inspired by another element from the original book cover, the flower stems.

I also changed part of the text format, as I thought it initially looked plain and boring, and so I made the author text line have inverted colours, with a white fill and dark blue outline; I thought this was especially effective as it not only made the title look more exciting but highlighted the author’s importance.


Software tutorials

The provided tutorials helped refresh my memory of what I knew, as I had prior, although basic, knowledge of Illustrator from past tasks. Two new tutorials I did use, however, were:

https://helpx.adobe.com/uk/illustrator/using/combining-objects.html

https://helpx.adobe.com/uk/illustrator/how-to/drawing-tools-basics.html

The first tutorial informed me of the pathfinder tool, helping me create the flower shapes, as well as understanding the tool’s other functions.

The second tutorial informed me of the join paths function, which helped me create the diamond shapes, as I used separate lines to create them.


Design resources and articles

https://creativecloud.adobe.com/discover/article/listen-up-how-to-create-compelling-podcast-cover-art

This article inspired this design, as it showed me how effective simple shapes could be when designed compellingly, hence my focus on the diamond shapes.


Learning throughout the module

Across the module, I have not only improved my prior skills in Photoshop, but learned and developed new skills in Illustrator, InDesign and After Effects. I learnt how to create and manipulate shapes efficiently in Illustrator using tools ranging from the shape tools, the line tool, the curvature tool and the pathfinder tool; at the start, I relied on simply changing the shape until it looked like I wanted, rather than fully understanding the process and so once I educated myself on the tools functions better, I was able to create shapes I wanted both easier and in shorter time. One of my wrong answers in the quiz at the beginning of the module was choosing Excel as most suitable to create a table, as I didn’t know there was a table creation tool in InDesign, so I enjoyed discovering and experimenting with that, although I hope to further develop my skills in making more complex looking tables. Despite the singular task in After Effects, I enjoyed it immensely, as animation is a sector of Graphic Design that I would like to become one of my strong points, and found dedicating a week to tutorials and articles learning about the program effective in helping me have a basic, solid foundation and understanding of the program.

Creating Shapes in Illustrator


Design ideas & design process

For this task I created a social media banner to accompany a podcast for ‘Homegoing’ by Yaa Gyasi. This illustration was one that is inspired by the book cover.

Homegoing book cover
Book cover for ‘Homegoing’ by Yaa Gyasi

I took inspiration from the flowers going up each side of the cover. They looked like simple enough shapes to recreate and an integral part of the design which would create a good link between my social banner design and the book cover. I used the pencil tool to draw the stem and then used the circular tool to create a smooth circle. I then added many smaller circles around the edge and merged the shapes together. This allowed me to create the cloud-like effect of the flowers. For the petals I again used the pencil tool to draw the outline and duplicated the shape for multiple petals. Once I had 1-2 different flowers I just duplicated them to give me multiple flowers across the front of the banner.

Creating the flowers


Duplicated flowers

I then moved onto the background. I wanted to use the same colours as the book cover to keep them closely related but I used different shapes. I decided to use a series of wave-like shapes to create a background that was completely original.

Background

After creating the background I added ‘Homegoing’ in the font Futura. I picked this font as it resembled the one used on the book cover but instead of red I chose black to keep it from blending into the background. This font is thick and heavy which makes the text stand out.

Social Media banner


Software tutorials

The task provided me with software tutorials I was able to use and watch prior to starting this task. The first tutorial I watched taught me about using the pencil tool to draw shapes and adjusting the smoothness setting to prevent getting rough lines. This is what allowed me to draw the stems of the flowers I used above. The tutorial also showed how you can edit paths you made by using the pen tool to allow you to achieve the exact shape.

The second tutorial went more in-depth about the pencil tool and shortcuts to draw straight lines. It then talked about the curvature tool where you can set anchor points a long a straight line and make it curved.

Another tutorial allowed me to learn about creating shapes and combining many smaller shapes to create a more detailed shape. This is the technique I used to create the ‘petals’ of the flowers above.

Along with these tutorials I found some of my own online that helped me better understand the tools I needed to use for this task.

Here are a few I found and used to help me with this task.


Design resources and articles

I also found some other resources online that went through creating, combining and cutting shapes to achieve the final shape I wanted. This was the main skill I needed for this task as this allowed me to create the main focus point of the banner, the flowers. It is also the skill I used to create the different coloured waves for my background.

https://blog.storyblocks.com/tutorials/playing-basic-shapes-adobe-illustrator/

https://www.vecteezy.com/blog/design-tips/shapes-in-illustrator


Learning across the module 

Across the whole module I have learned a variety of new skills on multiple softwares, some of which I have never used before. I have learned the basics of After Effects to create animated text and shapes along a timeline to produce a GIF. I have developed my InDesign skills which has also helped me across other modules. I have also been able to learn more about tools in Photoshop, cutting out images cleanly and precisely, editing images, and being able to make different images work together.

I am now used to saving files in different formats that allow me to use them across different softwares. Many problems can arise from not saving files properly and using the wrong formats which prevent you from opening them in certain softwares. I have gained good experience in saving files correctly which immediately prevents problems from occurring.

TY1SK Submission B Blog Post

Design Ideas & Process

For this task I had to design a Facebook banner to accompany a podcast called ‘Homegoing’ by Yaa Gyasi. This is my process on how I produced my final design.

From looking at the original poster for the podcast, I noticed various different features that I wanted to include in my design to keep the different mediums consistent and on brand. These specific areas I wanted to include is the use of colour, use of simple yet effective shapes, silhouettes and use of fonts.

In the original poster I observed that the rhombus shapes used formed a composition that helped with direction. Which further lead to white space for text and areas for character illustrations. I decided to use this in creating a funnel/arrow type effect to draw focus into a certain aspect. I made these shapes by using the ‘rectangle tool’ and moving 2 of the anchors. to repeat these shapes faster and more efficiently I used shortcut of ‘command + c’ and ‘option + drag’. Only using half of the required space allows room for text.

Within this area of focus I wanted to include the silhouette used in the original poster, however I believe that by not including the repeated pattern into the dress, it made the silhouette stand out more. This is because the overall design is far less crowded and easier to intemperate. I utilised the pen tool drawing out the outline whilst holding the ‘shift’ key to ensure smooth lines.


The chose the fonts in this design and their different weights to emphasise the title, author and quote. This was highlighted even further by separating via the use of the same colours within the rhombus pattern.


Software Tutorials

Because I was not very confident in using illustrator and more specifically utilising the pen tool (which from using it in this task and practicing with it have noticed it is an extremely vital tool within Illustrators armoury) I mainly used tutorials focussed on this. I used the pen tool heavily for the silhouette and for the buds in the bottom left. I then utilised tutorials around creating and manipulating shapes, which is how I created the the rhombus shapes. Below are the links to the tutorials:

https://helpx.adobe.com/uk/illustrator/how-to/shapes-basics.html

https://helpx.adobe.com/uk/illustrator/how-to/draw-vector-paths-with-pen-pencil-tools.html

Design resources & Articles

Because this was the first time I have looked into banners in detail and designing banners I started off before putting ‘pen to paper’ by looking at existing banners to gain some inspiration on the use of colours, compositions, effective fonts, use of images (in this case illustrations) and the use of shapes. I found this information on Facebook itself and Pinterest.

Learning Across the Module

I wanted to use this module to test me abilities by going out of my comfort zone through using software that I am not as confident in, Illustrator is being one of them. This is because I struggled to get my head around creating smooth curves utilising anchors, paths and handles. Once practicing with the pen tool in this module I familiarised myself with these aspects and became a lot more confident in drawing with vectors. I found that I became more efficient in using the tools as well, producing work a lot quicker than I did before.

Vector! That’s me, because I commit crimes with both direction and magnitude.

Design Ideas and Process

For the Illustrator task of drawing vector objects, we had to create a social media banner for the podcast by Yaa Gyasi: Homecoming. The first thing I did in the design process was research more into what the podcast was about. After seeing that this novel turned podcast spanned over 300 years following the lives of two sisters and the generations below them and their struggle with slavery, it was important to me to portray these themes in the advert of the banner. I also had listened to the start of the podcast to help me better understand the project I was designing.

My next step was to look at other examples of the cover of both the novel and the podcast. Although there where a couple of different variations of them, one commonality throughout was the use of the warm red, yellow and orange colours, particularly in the herringbone pattern. I decided this was something I was going to implement in my own design as to keep it recognisable to the podcast and to follow the brief whereby it should complement but not directly copy the cover design.

Creating a Silhouette Using the Pen Tool

My first idea was to use the cover on a different layer to use the pen tool to create a silhouette of the character on the cover.  At first I had just outlined the head, however  with the key theme of the podcast being slavery and oppression, I wanted to add in the shackle around her neck as I felt this was an important feature that creates necessary tension within someone seeing the design.


Software Tutorials

Editing the Anchor Points

One problem I encountered when using the pen tool was that I was struggling to get a perfect circle. To fix this instead fo using the pen tool I watch this video https://www.youtube.com/watch?v=lZZ0iYmgmvc which details how to use the pathfinder tool to combine objects. To achieve the final look I created an ellipse which I then combined with the illustration of the silhouette.

Although I found this effective, I still wanted to learn how to create a smooth ellipse using the pen tool as knowing how to do a task multiple different ways would come handy in the future.  I read this article https://helpx.adobe.com/illustrator/how-to/draw-edit-curves.html and attempted to draw the ellipse and then covert and edit the points to create the same smooth effect which also worked however I find was a longer way of doing this.


Design Resources and Articles

Creating a Grid for the Pattern

Including the one mentioned above, I read different articles throughout this task to help not only refresh my knowledge on illustrator but to also learn new skills. One of the first ones I read was from the brief: https://helpx.adobe.com/uk/illustrator/how-to/drawing-tools-basics.html which really helped me form a basis of where to being on illustrator and what tools to use such as the pen tool which was the first tool I chose when creating this design.

As mentioned on my Trello board, I struggled with how to achieve my desired output for the pattern of the design. First I wanted to do this by drawing vector objects however realised this would be time consuming and ultimately lead to disproportioned blocks. https://creativebeacon.com/make-easy-grids-in-illustrator/ This article helped me create a grid that I could use to make it look as though the thoughts and feelings of the story are represented in this feature of the design as they are then coming from behind the silhouette of the head, or ‘her mind.’ Alongside this I used this video https://www.youtube.com/watch?v=bwaG6n37i2k to help me understand how to fill in certain portions of the grid with the different colours from the original cover.


Learning Across the Module

The skills I have learnt from this module can been seen throughout all of the different softwares. I feel more confident in Photoshop and Illustrator, particularly in Photoshop when it comes to editing and removing objects from pictures. This was the focus in my week 3 plan and I am happy with the outcome I produced whereby the feedback I received from peers was that the removal of the arms from the photos was very successful.

When comparing the quiz results I can see that my understanding of what software to use for each project has improved as this was something I identified as a weakness at the start of the Autumn and Spring term however now I feel I can confidently decide what software to use for when.  One thing that the last two quizzes picked up on is that I need to work on are the specific features of the software such as what colour settings are best to use e.g. RGB and CYMK, along with how different resolutions affect the work. I feel as though this knowledge is something that can be easily learnt compared to learning all the different tools and what can be achieved in each of the softwares which will take practise to learn. In the future I am going to read more articles and watch videos on understanding colour schemes and basic document setups for adobe software as I think this will help me.


Social Media Banner for ‘HOMEGOING’

This term we were given a new set of design tasks to complete. In this post I will be discussing my design process and ideas on the ‘drawing vector objects’ task in Adobe Illustrator. This task involved designing an illustration that will be used as a social media banner to accompany a podcast for the book ‘Homegoing’ by Yaa Gyasi.


Design Ideas and Design Process


Creating swatches
creating swatches
swatches

To start of my design process I began by researching the original book design, as I wanted to make sure I incorporated parts of it in the banner design, I thought that if I did this it would allow the banner to be recognisable and link to the book cover. I used the eyedropper tool to select colours from the existing book covers, I then created my own swatches so that I could use them throughout my design quickly without having to use the eye dropper tool again and again.


Using the pencil and pen tool

I used the pencil tool to create a rough outline of a women. For this task I created two final outcomes. For the my first design idea that you can see on the left I used the two women that were on one of the covers of the book. I used the pen tool to roughly outline making sure to make trace as accurately as possible. For my second design idea I decided to use a completely new image that I took from google. For this image I did the same, and used the pencil tool to outline her side-profile as accurately as possible.

Mapping out an outline
pencil tool
Pen tool, discovering paths and curves

The next step was to use the pen tool. The pen tool is a tool that due to this task is something I now feel a lot more confident with and believe that my skills when using this tool have adapted a lot. Reflecting on last terms work, where I learnt how to use the pen tool, it is evident to me that I have now improved a lot using this tool, as last term I was just getting started and using it still needed more practice. I used this project to adapt these skills further. As you can see on the left I used this tool to make slight adjustments to the outline before I created a fill.

As shown below, you can see that I added a black fill, this was to create a ‘silhouette’ effect which most of the existing covers seemed to follow. If you look closely at my first design (on the left) you’ll see that I added a small curved line that followed the outline of the woman’s hair, this was to separate the two silhouettes slightly, so that they didn’t merge together and lose the outline shape.


silhouette
Fill image


Next I used the pencil tool again to create a sort of ‘cloud’ like shape for the flowers, I then used the keyboard shortcut to copt and paste this 3 times and I filled them in white and created the flower stem also.

Creating a flower outline
image fill

Initially I decided to place the flowers on each side of banner. However, later you will see how I decided to change this because there was no space for the text.

deciding layout
combining shapes and creating patterns
Discovering pathfinder
combining shapes
pathfiner ‘trim’
Final shape

The next stage of my design process, was to use shapes to create an African style pattern the book cover includes diamond shaped patterns so I wanted to include something similar. For my first design I just used the pencil tool and hand drew some triangles which unfortunately didn’t turn out as straight as I would have liked them to be. However I noticed that because they had curved and uneven edges it looked more authentic and African style. However for my second design I decided to experiment with combing two shapes together with the pathfinder tool to create straighter edged triangles. As you can see bellow I used the rectangle tool to create one square and one rectangle I then used the pathfinder tool to be left with half the square, a triangle.

Pattern


Final Touches

Finally I needed to put everything together I payed around with the placement of the pattern and decided that two strips one running along the top and one across the bottom looked best and also complimented the silhouette figure in the centre of the banner as well as leaving room for the title and author. I experimented with a a few different typefaces as well before deicding on my final two. I chose two different ones for each of my final designs.

Final product
experimenting with typography and colour
experimenting with typography
Final product

Software Tutorials

Before designing, I made sure to look at a few tutorials to help me undergo this task.
Some of the first things I looked at were the tutorials and links that were given in the brief for this task, This first one I looked at was from the adobe website and it focused on teaching how to use the pen and pencil tool, which was something really useful, and a core starting video to the basics of the tools function.

https://helpx.adobe.com/uk/illustrator/how-to/draw-vector-paths-with-pen-pencil-tools.html

The next website I looked at was another one from the brief, I found this one most useful out of the two, it focused on understanding paths and curves which I found helpful when creating the outline of the silhouette

https://helpx.adobe.com/uk/illustrator/how-to/drawing-tools-basics.html

Other tutorials I looked at were some that I found on youtube. I used this video to further expand my knowledge on the pen tool. I also found a tutorial on how to use the pathfinder tool, this helped when I needed to combine two shapes togther.


Resources for Research and Inspiration

Before starting my design, I researched a little into the book ‘HomeGoing’ I wanted to make sure I understood the book so that I could portray the same means into my banner as the book cover does. Pasted below are a few of the book covers that I found when researching. They all have similar ‘fiery’ colours which is one of the main reasons why I decided to use the orange, red and yellows that I swatches from the first book cover on the left. Something else that I noticed was all these different variations of the book cover seemed to have the woman as the centre of the design which is something I noted before designing my own. I also followed the pattern of the woman displayed as a silhouette.

Other inspiration I used was Pinterest, I used Pinterest to find other peoples designs. I searched ‘African patterns’ into the search bar and these Images below were some of the designs that popped up and Inspired me to create my triangle pattern.

Task Reflection

Homegoing

For the TY1SK module, we were allowed to choose four tasks to complete over four weeks, and one of the tasks was ‘creating vector objects’ in illustrator. We had to create an illustration for a social media banner, to accompany  podcast for the novel ‘Homegoing’, by Yaa Gyasi.

I chose to complete this task because I wanted to further explore illustrator, and I wanted to increase my skillset. I was also really fascinated by the theme of this novel and that is why I chose this task for my blog post.

 Design ideas and design process

I decided to use the same colours seen on the ‘Homegoing’ book cover, in my banner design, which I think would allow the viewers to see the banner and immediately recognise the book cover. I also kept the hexagon element in the centre of my design to hug the African continent, while pointing to the sisters either side. The African continent immediately offers context with Ghana to the viewer, with Africa being at the centre of heartache and home-going. I kept the symmetrical layout, suggesting a mirrored image. I think portraying the half sisters in a silhouette form makes the depiction universal. I wanted to portray their cultural connection to Africa and each other, and their vulnerability.

I wanted to create my own pattern, but still keep the geometric shapes found in African designs. Using the shape tool, I created a few rows of connected triangles and filled them with red and orange, similar to the book cover. Then I duplicated my triangle rows to create a pattern for the background. A useful video helped me to turn my pattern into a swatch which I could then place inside any shapes/outlines of my choice. I selected my design, trimmed it into a square shape, opened up pattern options, and  chose ‘make pattern’. This turned it into a swatch.

A screenshot showing the first step of creating my pattern


A screenshot showing the second step of creating my pattern


A screenshot depicting how I turned my pattern into a swatch

I drew the outline of Africa, and placed it in the centre of the banner, filling the shape with my pattern. I also placed the pattern around the edges of the banner, leaving a white hexagon around the outline of Africa.

I decided to incorporate flowers with a similar appearance to those seen on the cover, but gave them less visual impact so that it doesn’t distract from the sisters. The flowers are also mirrored symmetrically, and lean in towards the centre, guiding the focus of the viewer to the place of home-going.

A screenshot depicting the flowers that I drew and included in my illustration

To depict the spiritual side of the novel, the belief of death allowing a slaves spirit to return home, I decided to fade Esi by reducing the capacity. I think it shows the distance between her and Ghana, but also her soul. I kept Effia’s opacity 100%, and I tilted her head downwards to show her shame and sadness for being married to a slave trader.

I experimented with a gradient background, however it  did not compliment the other elements of my design, so I removed it. I still incorporated the gradient effect on my Africa outline, fading it in from the left. I think this depicts the lost cultural connection and identity of the displaced slaves.

A screenshot displaying the outline of Africa fading in, and the two half sisters, Esi (faded) and Effia (head tilted downwards)


A screenshot displaying the attempted gradient background

To emphasise the complexity of ‘love’ and brokenness of slavery, injustice, greed, and racism, I placed a broken heart on the African continent, where Ghana is located.

The typeface ‘Avenir’ is a geometric typeface which fits with my geometric design, but it also has a human touch which relates to the circumstances depicted in the novel. It is very clear and easy to read.

Software tutorials

The essential and recommended videos that were provided, were very insightful and useful.  Watching the videos reminded me of how to use the pen tool, shape tool, direct selection tool, and the shape builder tool in my designs.

The ‘Combine shapes’ video taught me how to combine shapes, by selecting the objects you want to combine, and using the shape builder tool, drag across the shapes to combine them into one shape. I did not use this skill in my banner design either, however it is something I could use in future designs.

I was unfamiliar with the Image Trace command, so that tutorial was insightful and I will definitely be using that skill in more of my designs in future, especially if I hand draw an image that I want to bring into illustrator.

I was not sure how to turn my triangles pattern into a swatch which I could then place as a fill into any shape/outline, so I found a useful video to help me, called ‘ How to Create Patterns in Illustrator Tutorial’, https://www.youtube.com/watch?v=n34-YmNJMrc .

Dansky showed two ways of turning a pattern design into a swatch/pattern. I trimmed my design into a square shape, selected the whole shape, went to window, pattern options, and at the drop down menu I just selected ‘make pattern’.

Resources for research and inspiration

To help me with my illustration for the banner, I read a summary of the novel on  https://www.bookbrowse.com/reviews/index.cfm/book_number/3418/homegoing 

It helped me to understand what the novel is about, and to gather my ideas of how to portray the two  sisters.  The summary gave me insights into the existing book cover design choices. It gave me ideas about how I could portray the two women in ways that depict their similarity, differences and connections.

It made me aware of their lost identities and also a sense of disconnect, because they are not even aware of each others existence. Reading the summary made me realise that there is a much deeper meaning behind the novel ‘Homegoing’. It is not just about the two sisters, it is also about so many other women and men, and slavery, greed, racism, and injustice. However there is also hope for reunion and home-going.

I found a very inspiring video tutorial called ‘Illustrator Tutorial | Web Banner Design (Shopping)’, https://www.youtube.com/watch?v=a9vzcdbPMOs Graphic designer, Kaukab Yaseen explained a variety of different skills and techniques to use, and showed how to create gradients, as well as blending an image into the side of his banner design and making the image to appear like it was fading into the rest of the banner.

Although the gradient background did not work with my illustration, I did still take inspiration from this video, by fading in my drawing of Africa. It also further inspired the idea of fading away Esi’s body by reducing the opacity, which I did to depict the idea of death allowing a slave’s spirit to return home.

I researched for appropriate typefaces for banner designs, and found useful information in a blog called ‘Most appealing Banner Fonts to use in 2021’ https://email.uplers.com/blog/most-appealing-banner-fonts/ ,and from this blog I found the typeface ‘Avenir’ which I found  very suitable for my banner design.

Homegoing, and not by choice

Design ideas and design process:

To create the wreath, I started with composing the cotton vector.  I drew a symmetrical cream circle and drew a leaf using the pen tool. I adjusted the leaf to be more symmetrical with the anchors.

Using snapguides I placed the leaf onto the intersection of the circle, but later adjusted it so that it was larger than the cotton bud, so it looked like the cotton was really encapsulated. I duplicated and reflected the leaf vertically and placed it behind the first leaf and added a stroke to the shape so that it was visible, but only just darker than the fill green so it wasn’t harsh. To make the cotton appear fluffy and less flat i made semicircles by removing paths from a circle and gave them a slightly darker stroke in a similar style to the leaves for additional detail. I arranged the additional cream circles behind the leaves and grouped the entire shape after selecting it to complete the cotton plant. I drew a curved line for the stalk and duplicated and arranged the plants into a wreath but found that I would have to edit some of the stalks to prevent awkward gaps. I also resized some of the duplicated plants to give the wreath some variety.

For the background I followed the original book’s artwork and used a similar colour scheme. I used the rectangle tool to create blocks to represent the land and sky. For the red path, I built a trapezium by adjusting the paths of a square and drew two rectangles that crossed at the centre of the trapezium as the fork in the road. I removed one of the paths by accident and found that a triangle created a better perspective effect than a long rectangle. I resized the wreath and adjusted the font colour (white on bright colours for better legibility) once the background was complete and used snapguides to centre it.


Software tutorials:

Most of the tutorials covered similar ground, primarily how to create complex shapes by combining simple ones, which helped me visualise how to break down images, so I don’t need to draw them. Other tutorials assisted me with my path and anchor tweaking skills as I have had difficulty with adjusting drawings to be less harsh. I do need more practice as the merge options are still confusing and I opted to multi-select my shapes and group them instead of combining them as there were difficulties.

Drawing the leaf and adjusting it for symmetry
combining the leaf shapes and giving them an outline for detail
Making the bud more complex by adding detail
Finished cotton plant
simple background made of geometric shapes
Initial attempt at drawing the paths with the pen tool
More accurate perspective shown with the triangular path shape
Adjusted centrepiece with additional information


Resources for research and inspiration:

I used the original book cover as inspiration for the colour scheme and the images I made. As the design was for a Facebook banner, I wanted it to be simple whilst still displaying the core themes of the podcast. I chose the paths to represent how despite being sisters the main characters were given very different lives- the destination of each path isn’t visible as the sisters didn’t have that foresight. It does kind of spoil it on the blurb, though.

Vector Graphics for ‘Homegoing’

This term, I undertook a range of design tasks for the TY1SK module with the aim of improving and building a better understanding of skills and techniques with Adobe software. In this blog post, I will discuss the ‘Drawing Vector Objects’ task, where I designed a social media banner for the book ‘Homegoing’ by Yaa Gyasi. I took screenshots throughout my design process to aid my explainations.

This task was based in Adobe Illustrator. Last term, I had never used Illustrator before and so focused on basic skills. Over the winter break, I practiced more with this software and picked up some important shortcuts using the keypad and I became much more confident with Illustrator. This allowed me to be more efficient while designing the social media banner for this task.

My Design Ideas and Process

Before I began designing, I created a colour palette based on colours featured in the example book covers that I found as inspiration (more on this later), as well as from the Ghana flag. To select these colours, I used the eye-dropper tool in Illustrator and made a selection of swatches to be used for my designs.

Final Outcome 1

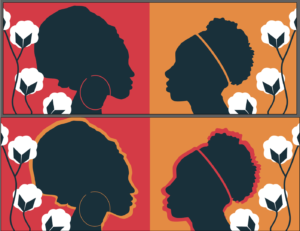
Below is my first banner design. Overall, I think this was also the most successful outcome.

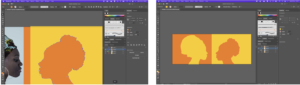
To create this design, I began by using a combination of the pen tool and the circle shape tool,  to outline the shape of the silhouetted woman. I then used the shape builder tool to merge these shapes into one element.

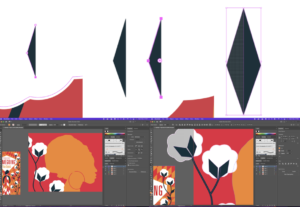
I then wanted to incorporate a traditional Ghanaian pattern. I utilised the rectangle tool and used the white arrow tool to manipulate them to make them rhombus-like shapes. I used the pattern builder to create a repeating pattern of this design.

I then added colour into my pattern, using the colour palette I had previously created.

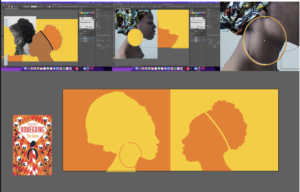
Next, I layered my silhouette on top of my repeating pattern, as well as an orange background colour. To make these layers fit perfectly to my artboard, I created a clipping mask.  I then used the offset path tool to add multiple coloured areas around the edge of the silhouette, creating border-like outlines. This idea was inspired by flames and fire.


Finally, I added the title ‘Homegoing’ in all caps text using the typeface Menco, a san-serif, which is similar to the type used on the book covers. I added this type to a path, which matched the edge of the silhouette. I also offset this, so it stood out better from the background pattern.


Final Outcome 2

Below is my second banner design. For this design, I used the same colour palette as previously mentioned.

For this design, I wanted the title of the book to be the most prominent element. I used the Menco typeface in both all caps and normal for the text to create typographic hierarchy. I wanted to try a different approach to incorporate the idea of flames and fire. I made a straight line stroke using the pen tool, before outlining the stroke and using the ‘distort & transform’ ‘zig-zag’ effect, to give a smooth wave affect inspired by the flames.

Next, I added the text on top of this pattern. To incorporate the silhouetted shape, I removed the ‘O’ of the ‘Homegoing’ and replaced it with the figure. I also made the outline stroke of the text and the figure white to make it stand out more from the background. To help make sure each element of the type was aligned, I used the ruler tool. I also used the clipping mask tool once again, to neaten my art-board.


Final Outcome 3

For this final design, I wanted to find a way to incorporate the cotton plant element that featured on several book covers that I had found during my research.


To illustrate these cotton plants, I drew circles and used the shape-builder tool to combine these shapes into one element. I also used the pen tool to create the stems of these plants. I used the same silhouette shape for this design too.

I wanted to play around with another way to add the title of the book and so I used the ‘text in shape’ tool to fill the silhouette with ‘Homegoing’.

Finally, as another way to add the idea of flames and fire, I played with the gradient tool to create the blur between orange and red to act as the background. To finish my design, I offset the silhouetted shape once more.


Software tutorials

Before I began my design process, I watched several video tutorial to help me use Adobe Illustrator and the tools and effects available in this software.

Firstly, I looked on the Adobe website and found the videos: ‘Create with drawing tools’, ‘Create and edit shapes’ and ‘Start making artwork’ all extremely useful. These videos helped strengthen my knowledge of the basic tools and techniques within Illustrator, before I could then explore some of the more complex and detailed skills.

I next searched on Youtube to find some further tutorials and demonstrations.The video: ‘How to use Shadow and Highlights in Adobe Illustrator CC 2018 , Fast Hot dog vector tutorial’ by Niko Dola was really fun to watch, as he showed how to create a hotdog using the different effects available on Illustrator, such as the warping tools and the distorting tools. I decided that I definitely wanted to play around with these effects when I created my designs.

The tutorial ‘Adobe Illustrator Tutorial: Create a Vector Pizza from Sketch’ by Dom Designs was also really useful, as it explains the process of turning a pencil sketch into a vector illustration. Finally the video: ‘Using Adobe Illustrator: 10 Tips for Beginners’ by Alice Thorpe, was valuable, as it outlined the basic tools and techniques I will need as a basis to develop my Illustrator skills further.

Youtube Tutorial Links:


Resources for research and inspiration

Before I started designing, I undertook some research into the book ‘Homegoing’. I read summaries, blog posts, reviews and watched introductory videos. These all gave me a better insight into the novel and its plot, which I thought was vital, as I wanted my designs to accurately capture and represent ‘Homegoing’. I also had a look at the different cover images used for this book. I noticed that all of the book cover variations that I saw featured bright orange, red and yellow colours. A lot of them also incorporated the silhouetted figure of a woman.

After reading reviews and descriptions of this novel, I discovered that fire appears throughout story as a symbol of the curse that haunts the family for generations. Finally, I found that this story is set in Ghana and features a cotton-picking plantation. Doing further research into the country Ghana (Republic of Ghana), I found that the flag features the colours red, yellow and green. At the centre of this flag is a black star. I also did some research into traditional patterns found in Ghana.  I decided I wanted to incorporate these ideas into my final designs in some way or another. Taking this all on board, I decided that the main elements I wanted to incorporate were the silhouetted woman, the idea of fire and traditional patterns from Ghana .

Below are a few covers that stood out to me during my research.

Below is the Link to the Youtube video that I found extremely valuable when conducting my research into the book ‘Homegoing’:

Evaluation

Overall, I really enjoyed this task. I feel that I was able to gain a better understand of the tools and techniques available in Adobe Illustrator and as a result, I feel much more confident using this software. I was able to explore different tools, techniques and effects, and I am really pleased with my final results. My favourite design was my first outcome with the pattern background and the offset colours around the silhouette. I think this might be due to the addition of contrast between the brighter off-white shade and darker navy-grey shade. On top of this, I think the repeating pattern element makes this design eye-catching and will allow it to standout when used as a social media banner.

Currently, Illustrator is my favourite software, but I definitely have room to grow and gain more knowledge and skills using it. I hope I become even more confident with design tasks to come.

Homegoing Banner

Design Ideas and Design Process

This is the vector drawing I created in response to a brief asking us to design a Facebook banner for the book “Homegoing”.  The task required us to base the banner of the existing cover for the book. In order to start generating ideas I pasted an image of the book cover next to my art-board in illustrator.  I wanted to have a deeper understanding of the book in order to guide my design ideas. To do this I read about the book on a BBC webpage which gave a brief summary of the themes conveyed in the book. This allowed me to keep my work relevant to the story. I decided to create a sense of duality in my banner as the story is based on two sisters leading very different lives lead and how this effects generations after them. I had the idea to create a banner with two silhouettes (as this would create a similar effect to the existing book cover), facing each other. I also looked at photography of west African women and found photos I could trace to make the banner contextually accurate to the setting of the book. 

 I started the design process off by using the eyedropper tool to grab two of the colours from the existing book cover and created two rectangles on each half of the art board in these colours. I pasted the images of the women in and flipped one round so that their was a ‘mirroring’ effect. I then began to use the pen tool to trace around the images, I used the command key to edit the handles (fig1). I then filled in the outline with the colour of the mirrored images background, creating a kind of cut out mirror effect (fig2).

(fig 1-2) showing the use of pen tool to create a mirrored SILHOUETTE effect


To add some detail to the silhouettes, I added a headband to one women and a hoop earring to another, I feel like this also added to representing the characters more accurately with them being of opposite classes in society. I used the shape tool for the earring and edited a circle to fit the shape of an earring and I used the pen tool for the headband. (Fig3-6).   

 (fig 3-6) showing the use of the shape and pen tools to create a hoop earring and headband 


To add some further detail to the banner. I replicated the plants seen on the book cover I did this by using the pen tool to create the rounded white shape, I then used the pen tool again to create half the diamond shape and duplicated this using the option key and dragging my mouse. I then flipped this and combined the  two shapes using the shape builder tool. (Fig 7-9). I then used the shape builder tool again, this time pressing the option key for remove, to remove the overlapping shapes going off the art board.(fig 10-11)

(fig 7-9) using the shape builder to create a diamond shape by combining two halves
(fig 10-11) using the shape builder tool to remove excess shapes


I decided that I wasn’t overly happy with the colours that I had used so I changed the silhouette shapes to match the dark navy colour that is used in the plants. I also wanted to add some more repetition to my design so I duplicated the silhouettes and made them larger behind the first ones to add an outline effect. (Fig 12-13) 

(fig 12-13) adding last touches – changing colour SLIGHTLY and adding a coloured outlines to the SILHOUETTE


Software Tutorials

For this task I found two tutorials. One very broad tutorial/course (https://www.youtube.com/watch?v=Ib8UBwu3yGA&t=10918s) which helped me to understand the software as a whole and was a good outline of the features it has to offer and how these can be used. I also found a shorter and more specific tutorial on how to create a silhouette in illustrator (https://www.youtube.com/watch?v=9EquA6Xje4g&t=443s). I found the illustrator course video on YouTube really beneficial as I feel like it took me through all the tools I needed to get a good grasp of the software. It demonstrated how to use the shape and line tools, the shape builder tool, the curvature tool, the pen tool, the pencil tool, brushes, gradient tool and the pattern tool as well as other features such as liquifying and distorting and bending and warping shapes. I think the most useful part of the tutorial was probably learning about the shape builder tool. This really helped me to realise that I could create any shape I wanted quickly and easily within this software. For example for this task I used the shape tool when creating the navy parts of the plants. I feel like this tutorial taught me that I really needed to practice using the pen tool, which I had aimed to do in this task and I feel as though my use of it was effective, especially in creating the silhouettes of the two women. The second tutorial helped to reinforce the importance of the pen tool in creating complex shapes and this is where I got the idea to trace an existing image.

Resources for Research and Inspiration

One of my main inspirations for this task was the original book cover for “Homecoming” as well as the actual story itself.  I wanted to create a social media banner that really represented the themes of the book whilst associating with the style of illustration used on the existing book cover. I learnt more about the book through reading (https://www.bbc.co.uk/programmes/articles/341QFdHDQGDqQzzx5P1BMmc/vote100books-7-novels-by-women-that-deserve-your-attention). I did also take a look at the different covers that had been previously designed to see how other designers had approached this book and its themes. Another strong influence on my work was researching photography of west African women. This allowed me to depict the characters accurately in terms of the hairstyles they would wear. It was also inspiring to see their clothes as this made me think about different patterns I could have used. The last thing I did to gain inspiration for this task was looking at a website that displayed different ways to create a Facebook banner (https://www.canva.com/learn/50-creative-facebook-covers-to-inspire-you/). This website displayed 50 different Facebook covers and was a really good insight into all the possibilities when designing a social media banner. It also helped me to consider things like where the banner wouldn’t be visible behind the profile picture. It was really useful to look at what worked well and what didn’t work well and apply this to my own work. Although it was not related to this particular task it did also help me to consider how the profile picture and banner need to compliment each other and the different ways this can be achieved. Overall all of these things were really influential in my final design.