Real Job: Georgina Wade, Lydia Hall and Taria Khan wrote and designed the fourth issue of the Typography and Graphic Communications’ ‘I am, we are… different by design zine’.
Background:
The ‘I am, we are, different by design’ is a zine created by students from the Department of Typography & Graphic Communication. The zine aims inspire a conversation by showcasing a diverse set of perspectives on design practice from students, alumni and design practitioners. This student-led project advocates for diversity and how to design with an inclusive mindset. We all got involved with the entire process of the zine, from planning and interviewing, to writing and designing. The opportunity to collaborate and learn from a variety of different creative perspectives we an inspiring part of the project to us. Seeing as this would be the fourth issue in the different by design, it made sense to continue the zine being A5.
Audience:
The zine is particularly aimed at those who have an interest in the creative field and would like to be educated in how to become an inclusive designer. The main audience would be those associated with the Typography and Graphic Communication department, such as fellow students and tutors but also prospective students.

Research:
The first task was to come up with topics that would suit the next issue of the zine. Coming up with the content proved to be a lengthy process, therefore as a team we brainstormed a variety of different topics we could potentially include within the zine. We created a mind map and came up with a few articles which we were very interested. We wanted to ensure our topic choices were diverse, yet still focused on diversity and inclusion. Initially, we looked at a variety of popular and current topics happening across the world, including the BLM movement or the Russo-Ukraini war. Additionally, we began looking at wider topics such as mental health, focusing on post pandemic mental health and the effects caused by the pandemic. Alongside our diverse range of topics, we wanted to showcase different artists and designers. Whilst also looking at a range of popular and current diversity topics happening across the world, we also wanted to include topics that were personal to us.

Interviews:
The first interview stage involved looking for a range of designers which specific interests to our zine topics about diversity and inclusion. As a group, we were each assigned one interview topic each to follow up and research. Since all our interviews featured our interviewees work, it was important to have the ethics approved before conducting our interviews. Our initial contact with our interviewees was conducted over email, enabling us to arrange our interviews online through emails or zoom calls. Our interviewing process allowed us to develop our own professional skills due to the professional nature that comes with conducting interviews. As well as giving us first-hand insight into diversity and inclusion about our chosen topics.
After collecting all our interview content, we then set about writing up our articles. All our interviewees had provided us with a wealth of information to work with, especially the Sky interview with Aanand and the ‘Design Can’ interview with Sabine. Copy writing the information to fit the zine proved challenging to us to ensure all out topics fit into the zine. By copywriting the information down it enabled us to consider our audience more and how they might engage with the zine’s content.
Copy Writing:
After one member of the team left, we had three people, we all spent the entire summer and autumn term collecting data for articles. For all the articles we read appropriate books, articles and other online resources to help us understand what we wanted to show to our readers.
Designing:
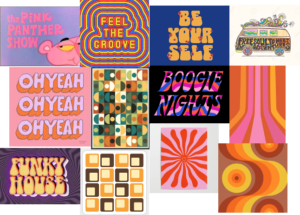
We started our design development stages by looking at the previous zines, focusing on the individual styles within each of the zines. This enabled us to get a better understanding of how we might create the potential style and layout of our zine. We eventually decided that each article would have its own personality, which each related to the subject of the article, whilst still also being consistent to the rest of the zine. By ensuring that each article had its own theme, it enabled us to demonstrate a diverse range of article designs throughout the zine. Additionally, this also enabled us to experiment with a range of different design methods, such as designing with an inclusive mindset through colour blindness, as well as culturally through Pakistani truck art and Urdu.
Typography:
Our choice of main text typeface was Halyard, as it was already being used in the latest issue to help created a sense of branding amongst the ‘Different by Design’ zines. By using existing paragraph styles from the suggested zine layout, it helped create the typography consistent throughout the zine. Each article then had a heading typeface which was related to the content, this allowed each article to have it’s own personality.
Grid:
Lydia provided the group with a grid layout, that was to be used for all the articles. Since the design of our articles were all different, it was essential that our page layout was consistent. One challenge that we faced was caused by the nature of our topics, it was important that our page layout didn’t appear rigid. Our grid system was an A5 page, that consisted of 6 columns with a 10pt gutter. The left and right margins were set as the default (36pts), with the top and bottom margins set to 39.638pts and baseline grid set at 12pts. By having these column widths, it enabled us to have more flexibility with image size and column width for each of our articles.

Interview sticker:
To help differentiate the interviews and book reviews from our other articles, we created different coloured stickers at the top right-hand corner of the zine to help the reader find each of the interviews easily. The interview stickers are blue, and the book review stickers are pink.
Example 1
Below are some of the developed spreads, from the first version to the final product.


Example 2
Below are some of the developed spreads, from the second version to the final product.


Production:
The specifications of the zine:
- A5 portrait booklet
- 36pp text prints 4/4 on Edixion 120gsm
- 4pp cover prints 4/4 on Edixion 250gsm
- Saddle stitched
- 1000 copies
After Rachel and Eric had approved the zine, we created the press ready pdfs and sent them off to print. Geoff, our in-house print technician, was incredibly helpful in this stage of the project and suggested to make a few minor changes, such as changing the photos from RGB to CYMK. We were really excited to receive his email saying that the printed zines had arrived, there’s nothing quite seeing the printed object which we had written and designed!
Reflection:
Taria:
We felt like if the zine had some kind of branding which would make it consistent to all the past and future zines. For example, we had troubles with the typeface if we had consistent branding it would limit the errors.
George:
Being part of this team helped me build on my communication and teamwork skills, enabling me to learn how to become more responsive and learn about methods such as ethics approval, which will be useful for the dissertation module. Having more freedom to choose and explore our own topics of interest for this zine was something I really enjoyed, as this is a unique opportunity on this course therefore it helped me to stay more focused and involved in the project. The challenges I faced were mainly focused on the Russo-Ukrainian poster, as this is something very personal to me therefore, something I really wanted to perfect.
Lydia:
I really enjoyed being on a wonderful team of designers and collaborating with my peers. With a zine about diversity and inclusion it makes sense to have a team of people with different backgrounds and experiences. This project was different to others in the sense that there wasn’t really a hard deadline, while this was good in some aspects, I did struggle to motivate myself and to move the project forward. I have learnt that creating those deadlines for myself and the rest of the team will help to keep the project going.