This term, we have undertaken various tasks that have allowed me to improve my skills in Photoshop, Illustrator, InDesign, and AfterEffects. The task that I enjoyed the most during this term was the Photoshop Creative Images task. I created three images that I am happy with.
DESIGN IDEAS AND DESIGN PROCESS

DESIGN 1 – FLOATING THROUGH SPACE
For my first idea, I wanted to create an image that altered reality so I chose to manipulate an image of a man floating through space. To start to design process, I browsed for stock images on Pixabey and found one of a man that looked like he is ‘floating’, and one of the stars that I could use as the background. I removed the man from the background of the original image by using the pen tool to create an outline around the figure. By selecting a new layer via cut, I removed him from the background and deleted the layer that i didn’t need. I then brought the images of the stars into photoshop and placed this layer underneath the figure. I then adjusted the brightness, contrast, and saturation of the images to make them look more authentic, and work in harmony with each other.
DESIGN 2 – FLOWER MASK

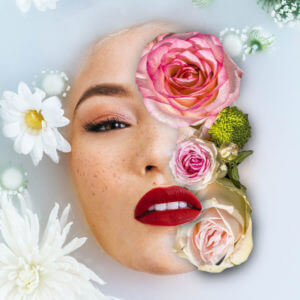
The second image I chose was of a woman’s face submerged by water and flowers. The effect that I wanted to achieve was flowers covering one-half of her face. To achieve this effect, I used layer masks and the brush tool to make a ‘shadow’. Firstly, I created a new layer mask and selected the part of her face that I wanted to remove. I then imported a picture of flowers and placed it underneath the existing layer so that you could see the flowers through her face. I used the selection tool to scale and position the flowers to fit the image and adjusted the existing layer mask, using the black and white brushes. I wanted to manipulate the image to make it look like the flowers were on top of the water and her lips were overlapping the flowers. I found it difficult at first but managed to get the hang of it after some time (and some tutorials). When I got to a point where I was happy with the mask, I tried to make the flowers look more realistic by adding a shadow. To achieve this, I used the black brush tool at a large size and 0% hardness to recreate a shadow around the flowers.

DESIGN 3
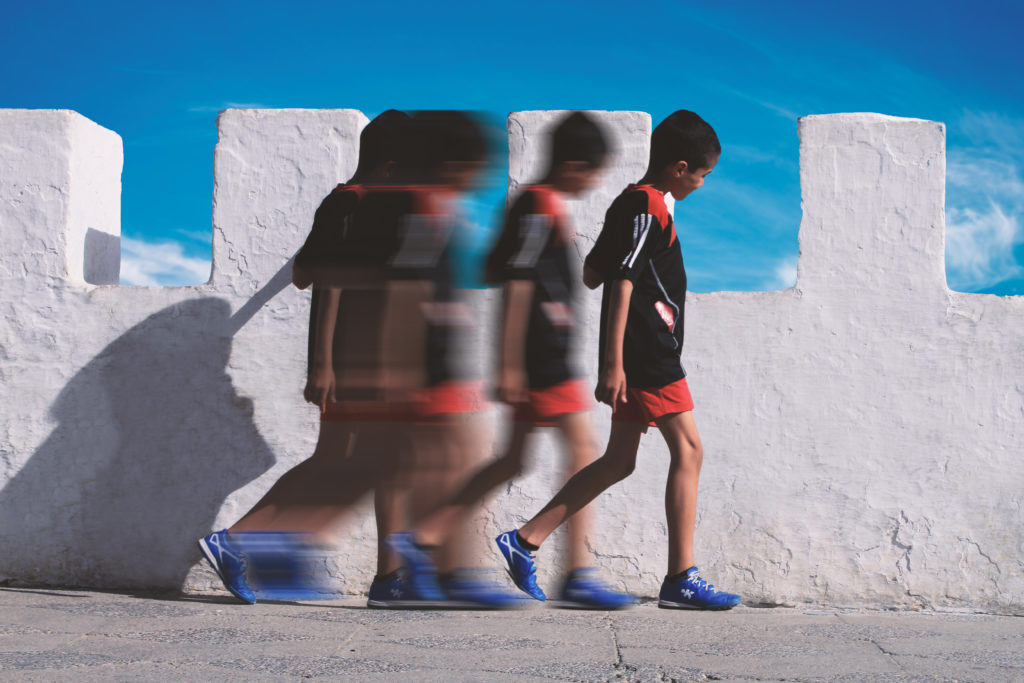
This design was my favourite that I created during the task. My idea for this image was to create a feeling of movement within an image. This was heavily influenced by Şakir Yildirim’s image called ‘crawler’. However, I did not follow the exact technique he uses to create his images. To make this image, I found a picture of a boy walking from a side-on perspective and imported it into photoshop. I then used the direct selection tool to copy his figure into a new layer and duplicate this layer many times and positioned them in such a way to look like the boy is walking from one position to the other. I kept one of these separate and placed it in the middle, and grouped the rest of them together. I merged these layers together and used the ‘motion blur’ filter to blur the figures, and did the same thing with the figure in the middle but made him less blurred to make it look like he was coming ‘back to life’, or transforming from one figure to another. the final figure on the far left and right I kept as normal but used the blur tool to blur the edges. This made the figure blend in more with the background ensuring that it didn’t look cut out of the image.
SOFTWARE TUTORIALS
I found the tutorials provided to us helpful to get started with this task. They refreshed my memory and I found it useful to focus on layer masks and using nondestructive techniques in my work. Using these techniques made it so much easier to go back on my design choices, and saved me from having to start all over again if I changed my mind. I often find that watching tutorials before taking on a task actually helps with my idea generation itself, and inspires me to get started.
I found the following tutorials particularly useful when working in Photoshop for this task. When using the tutorials, I tried not to follow them exactly but used them to get a rough idea of how to achieve an effect, and tried to find my own way of working. Each of these tutorials provided me with a better understanding of how tools within Photoshop work and inspired me to use Photoshop in different ways.
CREATING SHADOWS IN PHOTOSHOP
This tutorial on creating shadows in Photoshop came in helpful for my second design with the flowers to replicate the effect of a shadow. I used this in an attempt to make my image look more ‘real’ so I tried to follow the way light would naturally behave in real life. This tutorial inspired me to think about the perspective of light, and the depth of the image while I was editing. The tutorial covers how to create shadows on different surfaces. he uses the brush tool at 0 hardness, which is the technique is the technique I used in my own work. He also goes over how to create shadows for a curved surface, and more complex objects, which I didn’t need for this task in particular but will come in helpful in the future.
PHOTOSHOP TUTORIAL – FLOWER FACE EFFECTS
This tutorial helped me to grasp a better understanding of layer masks in photoshop and how to work with two images, one on top of the other. During the tutorial, she used the pen tool to create a stroke to select the parts of the original image that she wanted to remove, and uses the bevel and emboss layer style to make the cut outs look more 3D. she uses a layer mask to remove parts of the existing image to make the flowers appear on top of the face, giving a realistic effect. This tutorial was helpful to figure out how to make the flowers in my own design overlap with the face of the image.
MOTION BLUR EFFECT IN PHOTOSHOP
This tutorial introduced me to the motion blur effect in photoshop, one that I wasn’t already familiar with. I found that it was a really simple and easy way to introduce a sense of speed/ movement in my own image which was precisely the effect that I wanted to achieve. It also helped me with using layer masks, cutting out objects with the quick selection tool.
SOURCES OF INSPIRATION
The second image that I worked on for this task was inspired by the album art for Shawn Mendes’ album cover. I really love this album cover and wanted to create an image with the same sort of feeling. I wanted to edit an image that inspired by, but not a direct copy of the original. I used an image of a woman rather than a man, and only including half of her face instead of placing one half on top of the flowers.
There is a collage artist called Marcelo Monreal who also creates similar portraits, of people and flowers which also heavily influenced this design. I find that his work very appealing aesthetically but also in the way it makes me feel. His portrait creates this feeling of contentedness that implies the subject is at one with nature, which is how I would like to think my image would create too. You can find some of Monreal’s work here https://www.instagram.com/marcelomonreal/
My third design was inspired by the work of Şakir Yildirim. In particular, the portraits created using the liquify tool in Photoshop. Looking at his work inspired me to introduce a sense of movement, or duplication into my design. Yildirim’s work, specifically in ‘crawler’, creates a sense of motion, or almost a sense of transformation depending on how you interpret it. I find it fascinating that you can capture, or manipulate this very real sensation within a 2D image, which is the idea behind my third and final design for this task. You can have a look at Yildirim’s work here https://uk.gestalten.com/blogs/journal/new-perspectives-with-sakir-yildirim and find out how he uses Photoshop to achieve his portraits here https://helpx.adobe.com/uk/photoshop/how-to/liquify-filter-motion-effects.html
Overall, I really enjoyed this task. I have been able to improve both my skills and confidence with using Photoshop while creating some fun images that I am quite proud of.

