Social Media Banner for ‘HOMEGOING’

This term we were given a new set of design tasks to complete. In this post I will be discussing my design process and ideas on the ‘drawing vector objects’ task in Adobe Illustrator. This task involved designing an illustration that will be used as a social media banner to accompany a podcast for the book ‘Homegoing’ by Yaa Gyasi.


Design Ideas and Design Process


Creating swatches
creating swatches
swatches

To start of my design process I began by researching the original book design, as I wanted to make sure I incorporated parts of it in the banner design, I thought that if I did this it would allow the banner to be recognisable and link to the book cover. I used the eyedropper tool to select colours from the existing book covers, I then created my own swatches so that I could use them throughout my design quickly without having to use the eye dropper tool again and again.


Using the pencil and pen tool

I used the pencil tool to create a rough outline of a women. For this task I created two final outcomes. For the my first design idea that you can see on the left I used the two women that were on one of the covers of the book. I used the pen tool to roughly outline making sure to make trace as accurately as possible. For my second design idea I decided to use a completely new image that I took from google. For this image I did the same, and used the pencil tool to outline her side-profile as accurately as possible.

Mapping out an outline
pencil tool
Pen tool, discovering paths and curves

The next step was to use the pen tool. The pen tool is a tool that due to this task is something I now feel a lot more confident with and believe that my skills when using this tool have adapted a lot. Reflecting on last terms work, where I learnt how to use the pen tool, it is evident to me that I have now improved a lot using this tool, as last term I was just getting started and using it still needed more practice. I used this project to adapt these skills further. As you can see on the left I used this tool to make slight adjustments to the outline before I created a fill.

As shown below, you can see that I added a black fill, this was to create a ‘silhouette’ effect which most of the existing covers seemed to follow. If you look closely at my first design (on the left) you’ll see that I added a small curved line that followed the outline of the woman’s hair, this was to separate the two silhouettes slightly, so that they didn’t merge together and lose the outline shape.


silhouette
Fill image


Next I used the pencil tool again to create a sort of ‘cloud’ like shape for the flowers, I then used the keyboard shortcut to copt and paste this 3 times and I filled them in white and created the flower stem also.

Creating a flower outline
image fill

Initially I decided to place the flowers on each side of banner. However, later you will see how I decided to change this because there was no space for the text.

deciding layout
combining shapes and creating patterns
Discovering pathfinder
combining shapes
pathfiner ‘trim’
Final shape

The next stage of my design process, was to use shapes to create an African style pattern the book cover includes diamond shaped patterns so I wanted to include something similar. For my first design I just used the pencil tool and hand drew some triangles which unfortunately didn’t turn out as straight as I would have liked them to be. However I noticed that because they had curved and uneven edges it looked more authentic and African style. However for my second design I decided to experiment with combing two shapes together with the pathfinder tool to create straighter edged triangles. As you can see bellow I used the rectangle tool to create one square and one rectangle I then used the pathfinder tool to be left with half the square, a triangle.

Pattern


Final Touches

Finally I needed to put everything together I payed around with the placement of the pattern and decided that two strips one running along the top and one across the bottom looked best and also complimented the silhouette figure in the centre of the banner as well as leaving room for the title and author. I experimented with a a few different typefaces as well before deicding on my final two. I chose two different ones for each of my final designs.

Final product
experimenting with typography and colour
experimenting with typography
Final product

Software Tutorials

Before designing, I made sure to look at a few tutorials to help me undergo this task.
Some of the first things I looked at were the tutorials and links that were given in the brief for this task, This first one I looked at was from the adobe website and it focused on teaching how to use the pen and pencil tool, which was something really useful, and a core starting video to the basics of the tools function.

https://helpx.adobe.com/uk/illustrator/how-to/draw-vector-paths-with-pen-pencil-tools.html

The next website I looked at was another one from the brief, I found this one most useful out of the two, it focused on understanding paths and curves which I found helpful when creating the outline of the silhouette

https://helpx.adobe.com/uk/illustrator/how-to/drawing-tools-basics.html

Other tutorials I looked at were some that I found on youtube. I used this video to further expand my knowledge on the pen tool. I also found a tutorial on how to use the pathfinder tool, this helped when I needed to combine two shapes togther.


Resources for Research and Inspiration

Before starting my design, I researched a little into the book ‘HomeGoing’ I wanted to make sure I understood the book so that I could portray the same means into my banner as the book cover does. Pasted below are a few of the book covers that I found when researching. They all have similar ‘fiery’ colours which is one of the main reasons why I decided to use the orange, red and yellows that I swatches from the first book cover on the left. Something else that I noticed was all these different variations of the book cover seemed to have the woman as the centre of the design which is something I noted before designing my own. I also followed the pattern of the woman displayed as a silhouette.

Other inspiration I used was Pinterest, I used Pinterest to find other peoples designs. I searched ‘African patterns’ into the search bar and these Images below were some of the designs that popped up and Inspired me to create my triangle pattern.

Task Reflection

Podcast Sticker

This term was all about focusing on developing and learning new technical skills within the different Adobe softwares. I undertook 3 different tasks one using Photoshop one on InDesign and one with Illustrator. In this post I will be discussing the ‘Podcast Sticker’ task, which was created using  Adobe Illustrator. This was my favourite task out of the three and surprisingly the one that I found most challenging.

Design Ideas and Design Process 

For this task I began researching for different shapes that I wanted my sticker to be. I decided to go for a classic circle, simply because every time I said the word ‘sticker’ in my head I immediately thought of a circle.

Within this task I created three different final sticker outcomes. Starting with my first design, I watched a sticker tutorial on youtube to get some inspiration and a better understanding on the design process  and skills needed to create a sticker.

I took screen shots of my work at different stages throughout my design process so that I could really capture my development.

Final sticker outcome 1:

This was my First sticker design. Not my favourite however, definitely the most challenging out of the three, this was because the outline of the sticker was a lot more complex than my second and third designs where I used circle shapes. Before this design I watched a sticker tutorial on youtube to get some inspiration and a better understanding on the design process and skills needed to create a sticker (as I had never made one before).

To create this design I started by placing an ellipse (with the ellipse tool) in the centre of the page, I then duplicated this and made the outside eclipse slightly bigger and changed it to a different colour, I then duplicated it for a third time and made this one smaller.

I then used the ‘live shape options’ on the outer ellipse and dragged both widgets to create a sort of pie shape, this was where the words ‘graphic design where going to be placed.


Next I learned how to use the ‘type on a path’ tool, I used it twice one for the word ‘typography’, which is placed in the centre ellipse, and one for the words ‘graphic design’ which sits in the pie shape at the bottom.  This took a few trial and errors as I couldn’t work out how to make the word sit at the bottom facing the right way rather than it being upside down.
I also added a microphone silhouette as a podcast logo.


The Final step was to create the die-cut lines for the sticker. This was the trickiest part. First I made sure that I was working in a new layer,  then I selected everything and used the pathfinder window to unite it into a single shape, after this I changed the offset to the desired measurements  of the border I would like around my sticker shape. Once I had my offset I selected everything in the cutline layer and united again to make it one single shape, I then removed the ‘fill’ from this shape and gave it a 0.5pt stroke.  I then repeated these steps on a separate layer named ‘Cutcontourkiss’.


Final sticker outcome: 2

For my second design I decided to switch the shape for a circle, simply because every time I said the word ‘sticker’ in my head I immediately thought of a circle.
I used the same design process as sticker 1, by doing so I got to develop and practice all the new skills learnt when creating my first design.

I made sure that I used different layers throughout my design, one layer for the base of my artwork, one layer for the text, and two separate layers for each die-cut.


Final sticker outcome 3:

For my Final sticker design I kept the same theme as my second design, I thought that the yellow and black worked well together. In the design I experimented with, and learned a bit more about the ‘path tool’

Once I had my ellipse and had my text added, I created a straight line using the line tool, when this had lined up to the points I wanted I then selected the path tool and created a path in the centre of the line, this allowed me to be able to move my line from the centre point and create a curved line to go along the circumference of the sticker. I then duplicated this line and made it 1pt instead of 3pt. I created this to fill the gap between the text.

I also added two smaller ellipses at both ends of the line. This was to separate the line from the text.


The last step of my design was to create the die-cut lines for my sticker, using the same process that I mentioned when describing sticker 1.  However, this time the lines were to outline a circle.


Software tutorials

Before starting this task I watched some of the ‘getting started’ tutorials to help me develop a basic understanding of the software as a whole. I watched https://helpx.adobe.com/uk/illustrator/how-to/ai-layers-basics.html to also give me a basic understanding on the importance of layering, which led me to be mindful on what layer I placed things.


The tutorial attached below, helped me understand the process of how to create die-cuts, as I was able to follow step by step and recreate the lines on my own design. I found the process quite long and challenging and it’s definitely a skill that I need to develop further, and would like to master, so that I will be able to use this skill confidently in any future projects.

My first sticker design was actually based from the tutorial below. In this video I also learned about the ‘type on a path’ tool. I thought that incorporating this new tool into my design would work really well since I wanted to use a circle as the shape. I also learned how to move the eclipse with the ‘live shape tool’ and this allowed me to create that pie shape where I wanted the words ‘graphic design’ to sit.


Design resources and articles

https://helpx.adobe.com/uk/illustrator/using/drawing-pen-curvature-or-pencil.html 

This article helped me understand the draw with pen tool, which gave me the skill to create my curved line.

https://helpx.adobe.com/uk/illustrator/how-to/ai-layers-basics.html

I also found a page that went into a lot more detail about layers and how to organise content. This taught me how to move content from one layer to another, how to locate objects in the Layers panel, and how to hide layers.

After struggling with how to flip my text when using the ‘type on a path tool’ I wanted to get to grips and learn how to do it without having to trial an error. I actually found this article after I had finished my designs but I thought I would include it as I believe it helped me develop the skill to a higher level.

https://helpx.adobe.com/uk/illustrator/using/creating-type-path.html


Family Friendly

The aim for this mini project was to create two different flyer designs for the Reading Film Theatre.

To begin I sketched out some rough layout plans focusing on the different ways I could present the information given. I chose the layout that I thought displayed the information in a hierarchy where the most important information was displayed either in a larger font size of a different colour. In my two designs I had to make sure that I was considering the target audience these were

  • A father with two children under 10
  • A retired doctor and her husband, both of whom have a passion for old Hollywood
  • A visiting professor working in Reading, but originally from  Switzerland

Before I started my design I made sure that

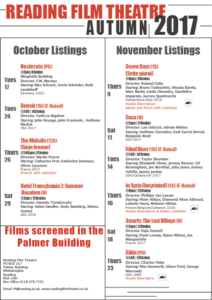
This was my first design. I chose to use red and black and white as these were the colours used In the Reading Film Theatres logo, also I found that these three colours are commonly  associated with theatres/cinemas.

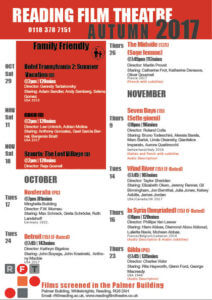
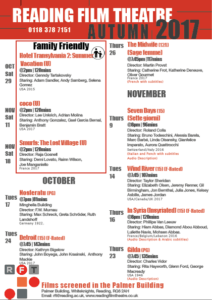
We were told to use two columns, so I decided to have one column for October listings and one for November listings. and in my second design I had one column for ‘family friendly’ listings and one for over 12s.  I used black lines to separate columns of information. However, in a feedback session I had one of my peers suggested to me to remove the black lines and she thought it was a bit too much and actually looked more overcrowded and messy.


Trade cards

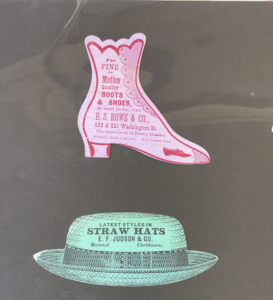
This was a really interesting session for me as we got to look at some things from the collection that we have access to in the department. This was one of my favourite pieces from the collection. I was immediately drawn to it because of the shapes and colours.  I loved how each one was shaped into what was sold at each shop, I thought that this was a really creative and thought threw design. When I looked at it initially I wasn’t quite sure what it was, I had a few thoughts. To me it seemed as though it could have been a tags or perhaps some kind of business card?

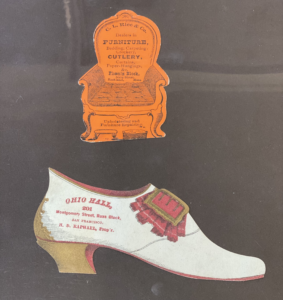
After the sessions I went home and researched to see if I could find out more information about them. I found that most were made in the mid/late 19th century, and that they were in fact trade cards. So these were used by merchants and traders to give to their customers, which were usually made out of paperboard or thick paper as these ones were. They are made small enough so that they fit inside a pocket for easy distribution.

New Minimalism

For this mini project we were given 10 different themes to choose from. Originally I chose the 70s retro style, I began researching and creating mood boards of  different colours, shapes and textures that I was inspired by.

When I started drafting my design ideas I found it really difficult to come up with an idea to represent me. I had experimented with three different designs which I did not like. I shorty realised that the colours of the theme I chose didn’t represent me as I wanted therefore, quite last minuet, I decided to change my theme to something I thought was more up my street. I love simple and elegant designs with a range of neutral colours and thought that the theme ‘New Minimalism’ was exactly that.

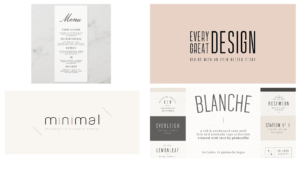
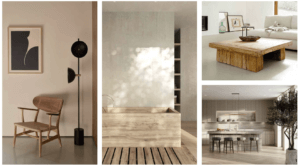
I started again by creating a first mood board of colours and textures that I found appealing that was related to my new theme, I focused on interior design and furniture from the website ‘interior trends’ which included; natural materials, raw woods, soft and earthy colours inspired by nature as well as some off whites and tobacco and browns.  This is where my inspiration for the background and textured circle came from. I took an image of wood and used the image trace tool (3 colours) to make it look a little more smooth, more graphic looking rather than realistic. I also then took the image of the wooden bath tube and used the drop colour tool to get the colours for my final design.

I then created a second mood board focusing on fonts and design layouts, I decided to design my logo in a circle as I thought it looked a bit more structured  and put together. I chose to work with two different fonts.

With regards to what I was going to name myself I experimented with a few different ideas these including my initials ‘NBM’, My full name ‘Nelly Bridger Morales’ which I found was too long. I then thought of just Nell as I didn’t want it to be just my name ‘Nelly’ as I thought that it was a bit too plain and basic. In the end I decided to use ‘Nelly’ as I realised it was quite a unique name and thought it was the perfect amount of letters.


The Cat In The Hat

For my Second book design we were given the instructions as followed…

  • Sticks to the basic rules of your first classic Penguin
  • Introduces new elements, or alters existing elements to create something funny / witty / insightful / relevant to the content or nature of your chosen book.

For this book cover design I chose to do ‘The Cat in the Hat’ as this was one of my favourite books as a kid. I stuck with the Penguin classic design but with my own twist. I chose the blue background colour for the base as this is the colour that the original book comes in. I also changed the font type to be more fun and in an unorganised arrangement as this is meant to be a book to attract kids.

I also added some Cat in the Hat features such as the well known hat and bow he wears and applied this to the penguin logo icon.

The Great Gatsby

For this task we had to follow a video tutorial and copy ‘The Great Gatsby’ penguin book cover. I really enjoyed this piece of work as I am fairly new to InDesign. I found that I was really engaged into the task  and learned lots of new tools and got to familiarise myself with the navigation of the software.

Primary Colours

This session run by Eric was all about ‘Lettering in the environment’ we had to search for lettering around the campus based on a theme of our choice and take photos of it.

We were given an hour to go around campus and collect photos for our theme. However I hadn’t really thought of a theme at this point and decided to just take photos of almost every piece of lettering that I walked past or could see.

Once I had finished taking photos I then decided to look through them and see if I could pick out a theme from it, which I did! I found that the majority of the photos that I took were primary colours.

As I was laying them out of my document I decided to group all the blue images together then all the red ones in another corner and then all the yellow ones. I chose to lay them out this way so that the colours stand out a lot more and to try show what my theme was.

Karaoke Jewellery box  


In this session Habibah gave me three words the first two were based off things that she liked and the last word was a fun fact.

The words she gave were:

  • Zayn Malik
  • Jewellery
  • Her dad knows Mr Tumble

I Began to brainstorm some ideas however I found it really difficult to try incorporate all three of her words. Initially I came up with a jewellery box that was decorated in the Mr tumble theme colours, although I thought this idea was good, I quickly realised that I had not incorporated Zayn, which was her most important word. I then realised that I was thinking about generic gifts and things that probably exist already and the aim of this task was to make the ‘ideal gift’ for your partner meaning I could come up with anything.

For my final outcome I continued with the idea of a jewellery box decorated with the Mr Tumble theme but I added a flat screen on the lid of it so that when it opens you can chose the songs that you want it to play for you as well as having the lyrics displayed on the screen so that you can sing along, This way Habibah can listen to her favourite singer Zayn