
How to foil on a white background
- Switch on machine and wait for green ‘ready’ light allowing 20 mins for machine to heat up (temperature 122°C, speed 2).
- Once heated, put blank piece of paper under the rollers, pull leaver up to engage rollers and press ‘Start’. This ensures no ink is on rollers from previous jobs.
- Print text or imagery that you want to be foiled as black.
- Cut a piece of foil large enough to cover the area to be foiled and place on text/image (metallic side facing up).
- Secure the corners and top side of foil with Washi tape (see photo 1).
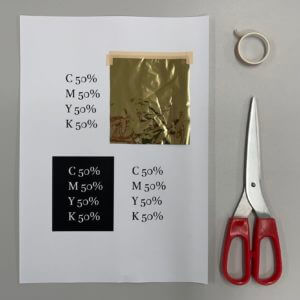
Photo 1
6. Place sheet squarely on bed of machine with the top edge of page under roller. Pull leaver up to engage rollers and secure page in place
(see Foiler Video).
7. Press ‘Start’ immediately.
8. When page has fed through machine press ‘Stop’ and push leaver down to raise rollers.
9. Slowly peel away unfused foil and Washi tape to reveal foiled area (see photo 2).
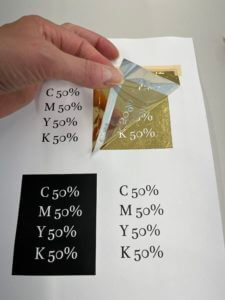
Photo 2
10. Switch off machine.
How to foil on a coloured background (including images)
- Switch on machine and wait for green ‘ready’ light allowing 20 mins for machine to heat up (temperature 122°C, speed 3).
- Once heated, put blank piece of paper under the rollers, pull leaver up to engage rollers and press ‘Start’. This ensures no ink is on rollers from previous jobs.
- When creating the document, ensure the content that you want to be foiled is on a separate layer, set in black. If you are printing something of around A3 size, print on banner paper.
- Print the background only. When printing image or coloured background, make sure to turn off visibility for the layer you want to be foiled and in print settings go to ‘General’ > ‘Options’ > ‘Print Layers’ > ‘Visible Layers’ (see photo 3).
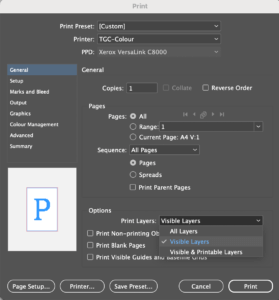
Photo 3
5. Make a mark on back of originally printed background on the side that came out first to avoid confusion later on about what way round to put it when overprinting.
6. Pull laminate to a forearms length. Put 250gsm banner paper on top of laminate (see photo 4) and feed it through machine and underneath metal bar on left side until the laminate is out from under the card (see photo 5).
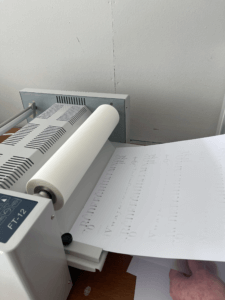
Photo 4
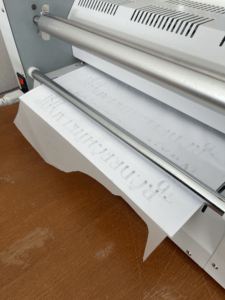
Photo 5
7. Put the rollers down and press ‘Start’ (Speed 3) to ensure there are no creases of laminate on the card. Press stop and lift rollers back up when you see no creases on the laminated card on left hand side. Make sure there is always paper/card sticking out of the machine on the right hand side.
8. Put you work with the side you want laminating facing up and overlapping end of card that is already in the machine. Make sure you do not overlap your work as this will crease your work. If your work is double sided, put a piece of plain paper underneath to make sure no ink from your work gets transferred onto the rollers.
9. Put the rollers down and press ‘Start’ (Speed 3), ensure to guide your work through and make sure the paper coming out the other end is guided out so it does not hit anything as this will cause problems with the machine.
10. Once your work is feeding through, get another piece of paper and put it underneath the end of your work, ensure there is sufficient overlap. Once again, make sure the overlap is just over white paper, not your work otherwise this will crease your work.
11. Allow the paper your work is printed on to feed the entire way through the machine and once it is out underneath the metal bar, press ‘Stop’ and lift up the rollers.
12. Cut the laminate at both ends of your sheet, making sure to do it accurately so it will go through the printer again smoothly. Gently pull the laminate back through the foiler and trim where it has laminated over the last piece of paper you put in. Roll the excess back onto the roll and dispose of the paper.
13. Now you need to print the layer that will be foiled. Put the laminated card into the printer the same way it came out. Ensure the layer you want to be foiled is the only visible layer and in print settings go to ‘General’ > ‘Options’ > ‘Print Layers’ > ‘Visible Layers’.
14. You have to specify the type of paper in print settings by going to ‘Printer’ > ‘Print Features’ > ‘White Glossy Cardstock’. You will then need to select this on the printer when you go to print.
15. Cut a piece of foil large enough to cover the area to be foiled and place on text/image (metallic side facing up). If you are foiling a large area, see Geoff or Isabel.
16. Secure the corners and top side of foil with Washi tape (see photo 1).
Photo 1
17. Press ‘Start’ immediately (speed 2).
18. When page has fed through machine press ‘Stop’ and push leaver down to raise roller.
19. Slowly peel away unfused foil and Washi tape to reveal foiled area (see photo 2).
photo 2
20. Switch off machine.