
The brief
The CQSD teaching guide project was to design a leaflet/brochure that is easily accessible to busy lecturers to help them to effectively use the space they are teaching in. The client was trying to communicate different teaching methods and how these can be used in the room that they have been allocated to. Lecturers are often allocated a room that they are not familiar too and therefore may not know the best way to teach in that room.
I signed up to this job because I wanted to enhance my InDesign skills and work closely with a client who wanted to design this for an event. I was interested in working on a university branded project as it allowed me to work within set brand guidelines which is a fairly new experience, so I wanted to see the challenges and positives of working this way.
Meeting the client
The first meeting with a client sets up the tone of the new working relationship, to prepare for thisI thought of a series of questions I needed to know about the client and the project. This set a good foundation for what would be discussed in the meeting. During this initial meeting, I found out key information about the project such as the background, the concept, the target audience and any initial thoughts that the client envisioned the final outcome to be.
After the meeting with the client, I thought about all the skills I would need to be able to complete this task. I needed to master InDesign to be able to complete this well so I set about learning more about the editorial features (such as baseline grids) and how I could use these to benefit me and the finished design.
Restating the brief was a challenge to start with as I was not sure what to include. However, I did my best and got advice from my supervisor as to what was necessary and what was not at this stage. I was advised that I should reconsider deadlines to allow time for print and time for flexibility to meet with the client and work around other commitments. I soon realised that it was necessary to be flexible and more realistic about time scales by considering long-term obstacles that may pop up.
The design stages
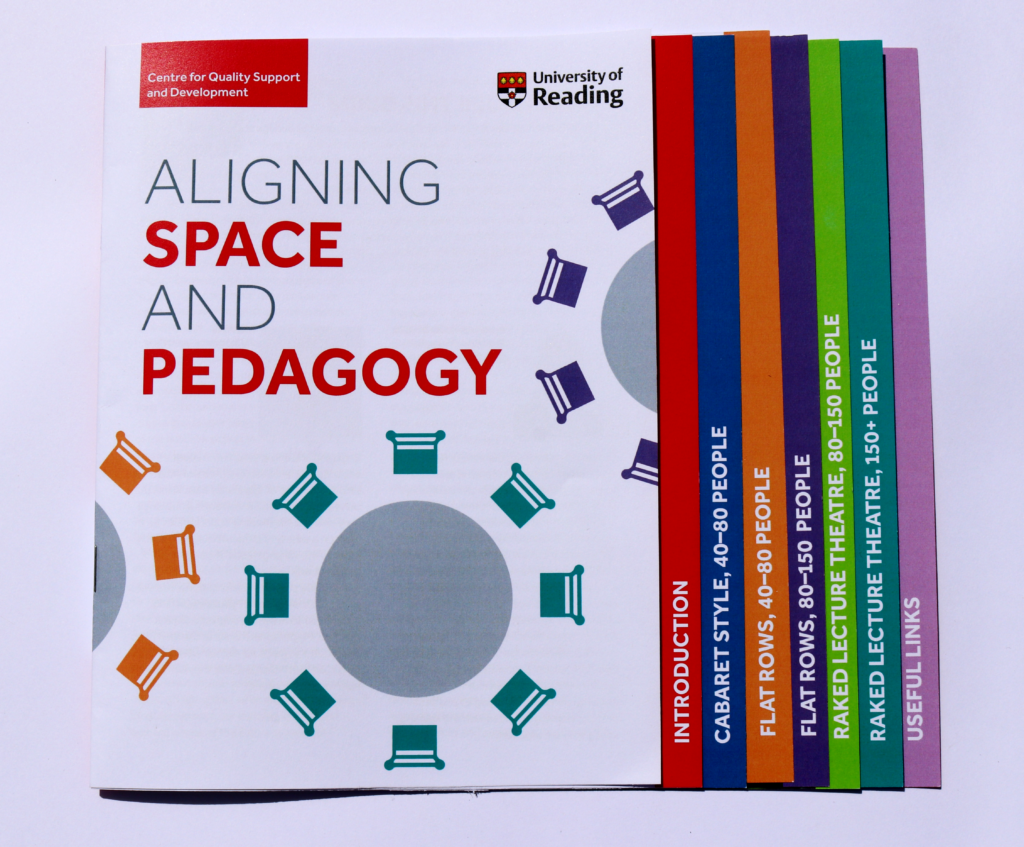
I started off designing this project by creating exactly what the client had asked for – an A4 brochure with tables and photos. I soon became to realise that this was not the most creative I could be, and although I wouldn’t be creating what the client was envisioning, I had to think that she is not a designer and might not know other paths the design could go down. This got me started on brainstorming new, more interactive designs. I had the idea of creating a flip book that would have each of the categories as a new page in it. I mocked up the version the client had asked from, and the new more creative booklet I had started designing, then arranged a meeting with the client to show her these drafts.
The second time I met with my client I first showed her the original A4 booklet, which she was happy with, until I pulled out the new flipbook design. Instantly, she was excited by this new design, she said that she had not thought of any thing like this before and said ‘but I guess that’s why you’re the designer!’. The enthusiasm she showed over this design, made me excited to go in this new direction and as soon as this meeting as over I set about requesting estimates and developing the design.
The initial estimate of costing for the project was higher than the clients original budget, however, once discussing this the client she was happy to increase the budget to get the higher quality product.
This design required a lot of accuracy and planning because of the different page sizes that created the flip book edge. I also found that after creating the big concept, a lot of time was taken perfected the finer details, such as, spotting n-dashes instead of hyphenation, editing line breaks and fixing widows and orphans. Throughout my experience with this project, I learned a lot about the features of InDesign and how to create an accurate InDesign file using features such as, grids, paragraph styles and layouts. This experience helped me to improve all of my projects as I was more aware of and able to use all the features available to me. Constant feedback from my supervisor was helpful as these InDesign techniques were things I was either shown or was able to work out with the features, once I realised I had to learn to do something new to fix an issue.


The problem I encountered
After signing off the job and sending off to print is where my main learning curve occurred. Although I had previously gotten an initial estimate of the design, I had forgotten that even the slightest changes in design can change an estimate quite dramatically. During the development of the flip book I had slightly adjusted the page sizes, this meant that it no longer fitted onto a B4 piece of paper, this increased the price by another £100. This was now way over the client’s initial budget. I tried to fix this by changing the page size but by this stage it was too late. After discussion with my client and the Real Job team, it was decided that the final print could go ahead with this higher price because there was a deadline to meet and the client was able to stretch the budget. What I learnt from this was firstly, always get regular updates on estimates because they are very likely to change, and secondly, that clients are people too, they do realise that mistakes can be made an solutions can always be found.
Conclusion
Overall, I enjoyed working on this project a lot because of the final outcome as well as the support from my client, my supervisor and the Real Jobs team. From this project, I have become a lot more confident in using Adobe InDesign, as well as being able to communicate with clients, and I would look to take on more projects in the future that involve using these new skills. I have learnt that I have the ability to think of new concepts and what I need to work on most is remembering to pick up on the finer details to make an overall more accurate design to back up the bigger ideas.

